一、PXE
1. 概述
PXE (Pre-boot Execution Environment, 预启动执行环境)是由Intel公司开发的最新技术,工作于Client/Server 的网络模式,支持工作站通过网络从远端服务器下载镜像,并由此支持通过网络启动操作系统;在启动过程中,终端要求服务器分配IP地址,再使用TFTP(Trivial File Transfer Protocol)或者MTFTP (Multicast Trivial File Transfer Protocol)协议下载一个启动软件包到本机内存执行;由这个启动软件包完成终端基本软件设置,从而引导预先安装在服务器中的终端操作系统。
| 严格来说, PXE 并不是一种安装方式,而是一种引导方式。进行 PXE 安装的必要条件是在要安装的计算机中必须包含一个 PXE 支持的网卡(NIC), 即网卡中必须要有 PXE Client , PXE 协议可以使计算机通过网络启动。此协议分为Client端和Server端,而 PXE Client 则在网卡的ROM中,当计算机引导时,BIOS把 PXE Client 调入内存中执行,然后由 PXE Client 将放置在远端的文件通过网络下载到本地运行。运行 PXE 协议需要设置DHCP服务器和TFTP服务器;DHCP服务器负责给 PXE Client (将要安装系统的主机),分配一个IP地址,由于是给 PXE Client 分配IP地址,所以在配置DHCP服务器时需要增加相应的 PXE 设置;此外,在 PXE Client 的ROM中,已经存在了TFTP Client,那么它就可以通过TFTP协议到TFTP Server上下载所需的文件。 |
2. 工作过程
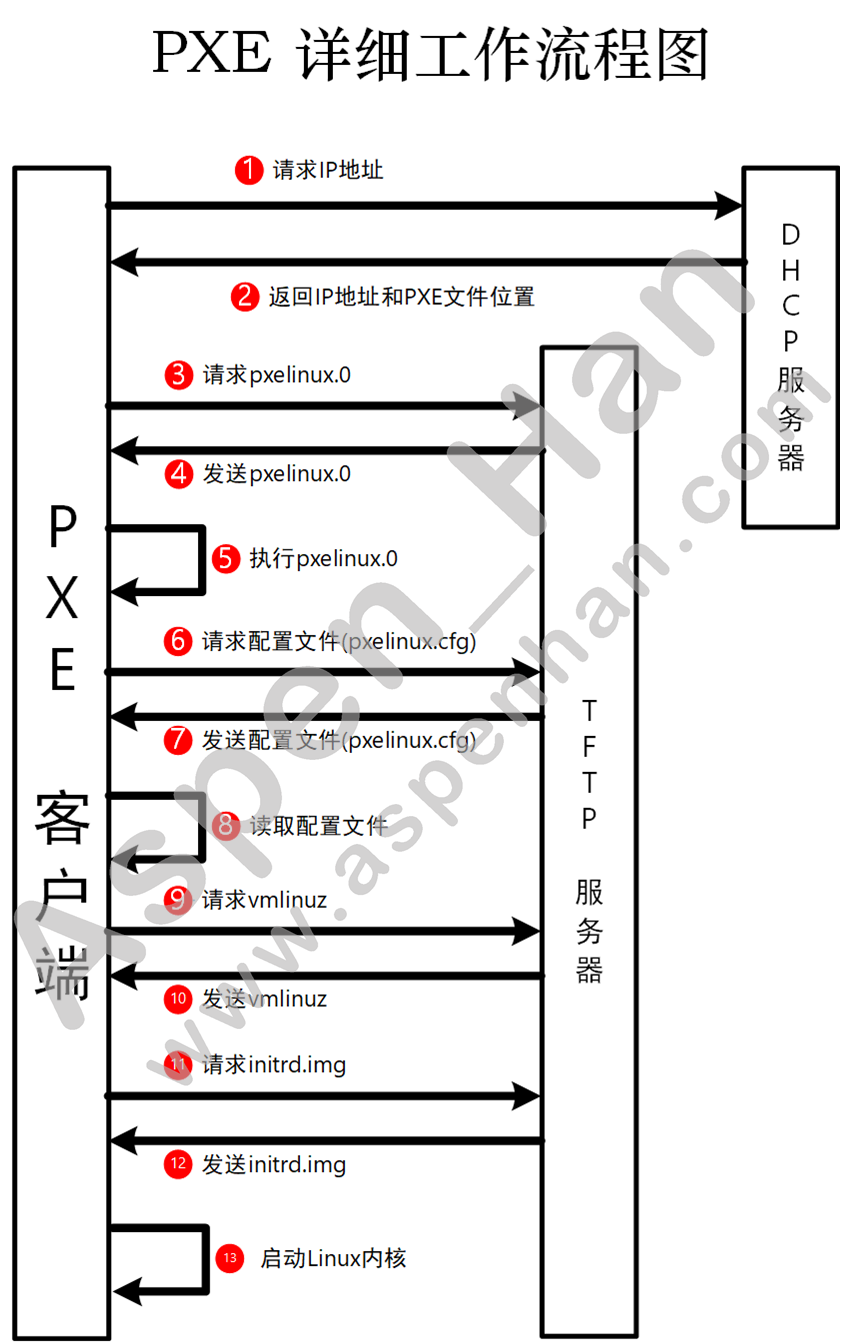
step 01 PXE Client 从自己的PXE网卡启动,向本网络中的DHCP服务器索取IP地址;
step 02 DHCP服务器返回分配给客户机的IP以及PXE文件的放置位置(该文件一般是放在一台TFTP服务器上);
step 03 PXE Client向本网络中的TFTP服务器索取pxelinux.0文件;
step 04 PXE Client取得pxelinux.0文件之后执行该文件;
step 05 根据pxelinux.0的执行结果,通过TFTP服务器加载内核和文件系统;
step 06 进而进入安装界面,此时可以通过选择HTTP,FTP,NFS方式之一进行安装;
二、Kickstart
1. 概述
Kickstart 是一种无人值守的安装方式;它的工作原理是在安装过程中记录典型的需要人工干预填写的各种参数,并生成一个名为ks.cfg的文件;如果在安装过程中(不仅局限于生成Kickstart安装文件的机器)出现要填写参数的情况,安装程序首先会去查找Kickstart生成的文件,如果找到合适的参数,就采用该参数;如果没有找到合适的参数,便需要安装者手工干预了。所以,如果kickstart文件涵盖了安装过程中可能出现的所有需要填写的参数,那么安装者完全可以只告诉安装程序从何处获取ks.cfg文件,然后就去忙自己的事情;等待安装完毕;安装程序会根据ks.cfg中设置重启系统并结束安装。
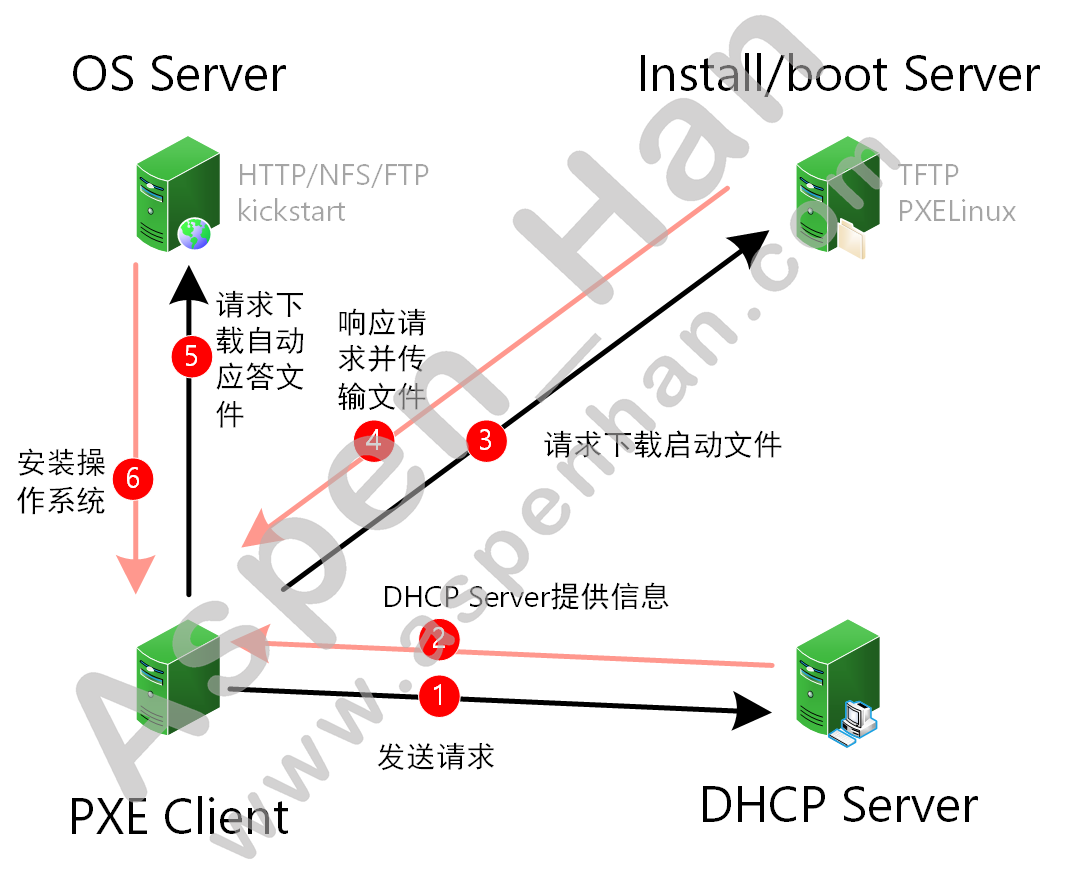
2. PXE+Kickstart无人值守安装系统系统工作流程
- DHCP: pxelinux.0; next-server指向TFTP server的IP地址;
- TFTP : syslinux; vmlinuz; initrd.img; ks.cfg;
3. Kickstart应答文件
系统默认ks文件为/root/anaconda-ks.cfg
| kickstart 可以借助 system-config-kickstart 工具创建kickstart定制化文件。但是 system-config-kickstart 工具,依赖操作系统图形化界面;因此需要安装图形化界面软件包 X windiow system 和 GNOME Desktop 。 |
| yum groupinstall -y "GNOME Desktop" |
step 01 安装kickstart工具
| yum install -y system-config-kickstart |
[root@pxe ~]# yum install -y system-config-kickstart
Loaded plugins: fastestmirror, langpacks
Loading mirror speeds from cached hostfile
......
Installed:
  system-config-kickstart.noarch 0:2.9.7-1.el7

Complete!
[root@pxe ~]# systemctl set-default graphical.target
Removed symlink /etc/systemd/system/default.target.
Created symlink from /etc/systemd/system/default.target to /usr/lib/systemd/system/graphical.target.
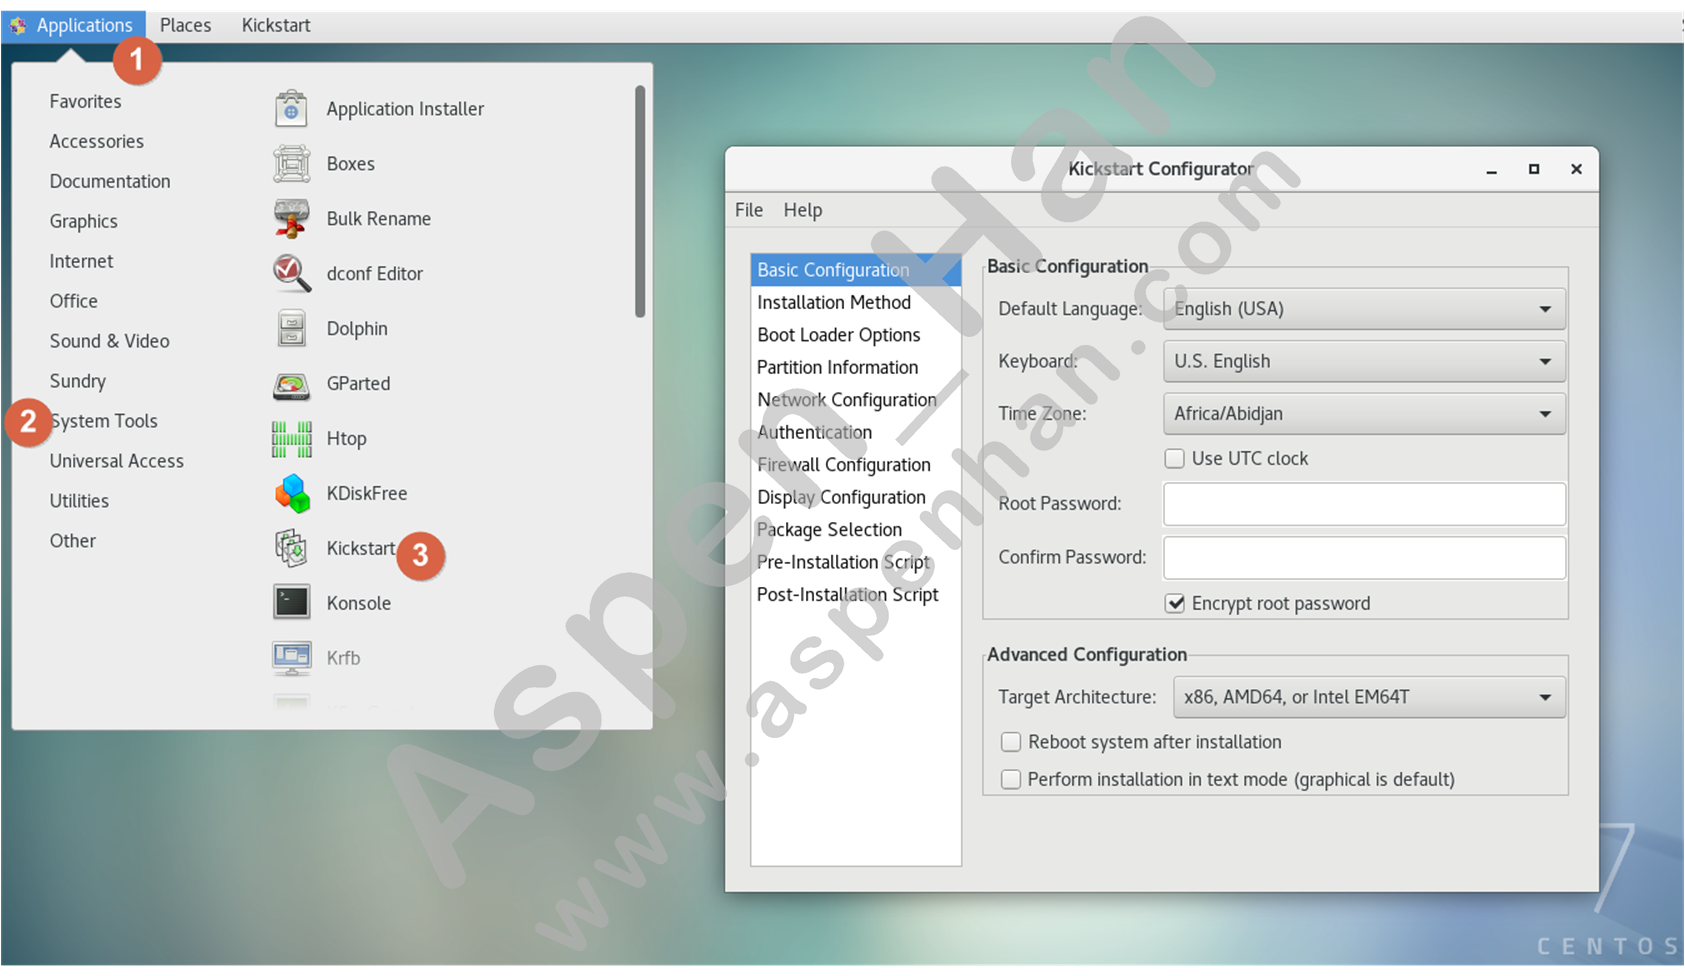
step 02 进入图形界面,打开kickstart工具
step 03 修改Package Selection的Bug
|
# 解决方案: 挂载光盘,配置本地YUM源 mount /dev/cdrom /mnt rm -rf /etc/yum.repos.d* # /etc/yum.repos.d/local.repo [development] name=CentOS baseurl=file:///mnt gpgcheck=0 enabled=1 #gpgkey=file:///etc/pki/rpm-gpg/RPM-GPG-KEY-CentOS-7 # 重装system-config-kickstart工具 yum remove -y system-config-kickstart yum remove clean all yum remove install -y system-config-kickstart |
[root@pxe ~]# mount /dev/cdrom /mnt/
mount: /dev/sr0 is write-protected, mounting read-only
[root@pxe ~]# ls /mnt/
CentOS_BuildTag  EULA  images    LiveOS    repodata              RPM-GPG-KEY-CentOS-Testing-7
EFI              GPL   isolinux  Packages  RPM-GPG-KEY-CentOS-7  TRANS.TBL
[root@pxe ~]# rm -rf /etc/yum.repos.d/*
[root@pxe ~]# ls /etc/yum.repos.d
[root@pxe ~]# vim local.repo
[root@pxe ~]# cat local.repo
[development]
name=CentOS
baseurl=file:///mnt
gpgcheck=0
enabled=1
[root@pxe ~]# mv local.repo /etc/yum.repos.d/
[root@pxe ~]# ls /etc/yum.repos.d/
local.repo
[root@pxe ~]# yum remove -y system-config-kickstart.noarch
Loaded plugins: fastestmirror, langpacks
Resolving Dependencies
......
Complete!
[root@pxe ~]# yum clean all
Loaded plugins: fastestmirror, langpacks
Cleaning repos: development
Cleaning up list of fastest mirrors
Other repos take up 734 M of disk space (use --verbose for details)
[root@pxe ~]# yum install -y system-config-kickstart
Loaded plugins: fastestmirror, langpacks
Determining fastest mirrors
......
Complete!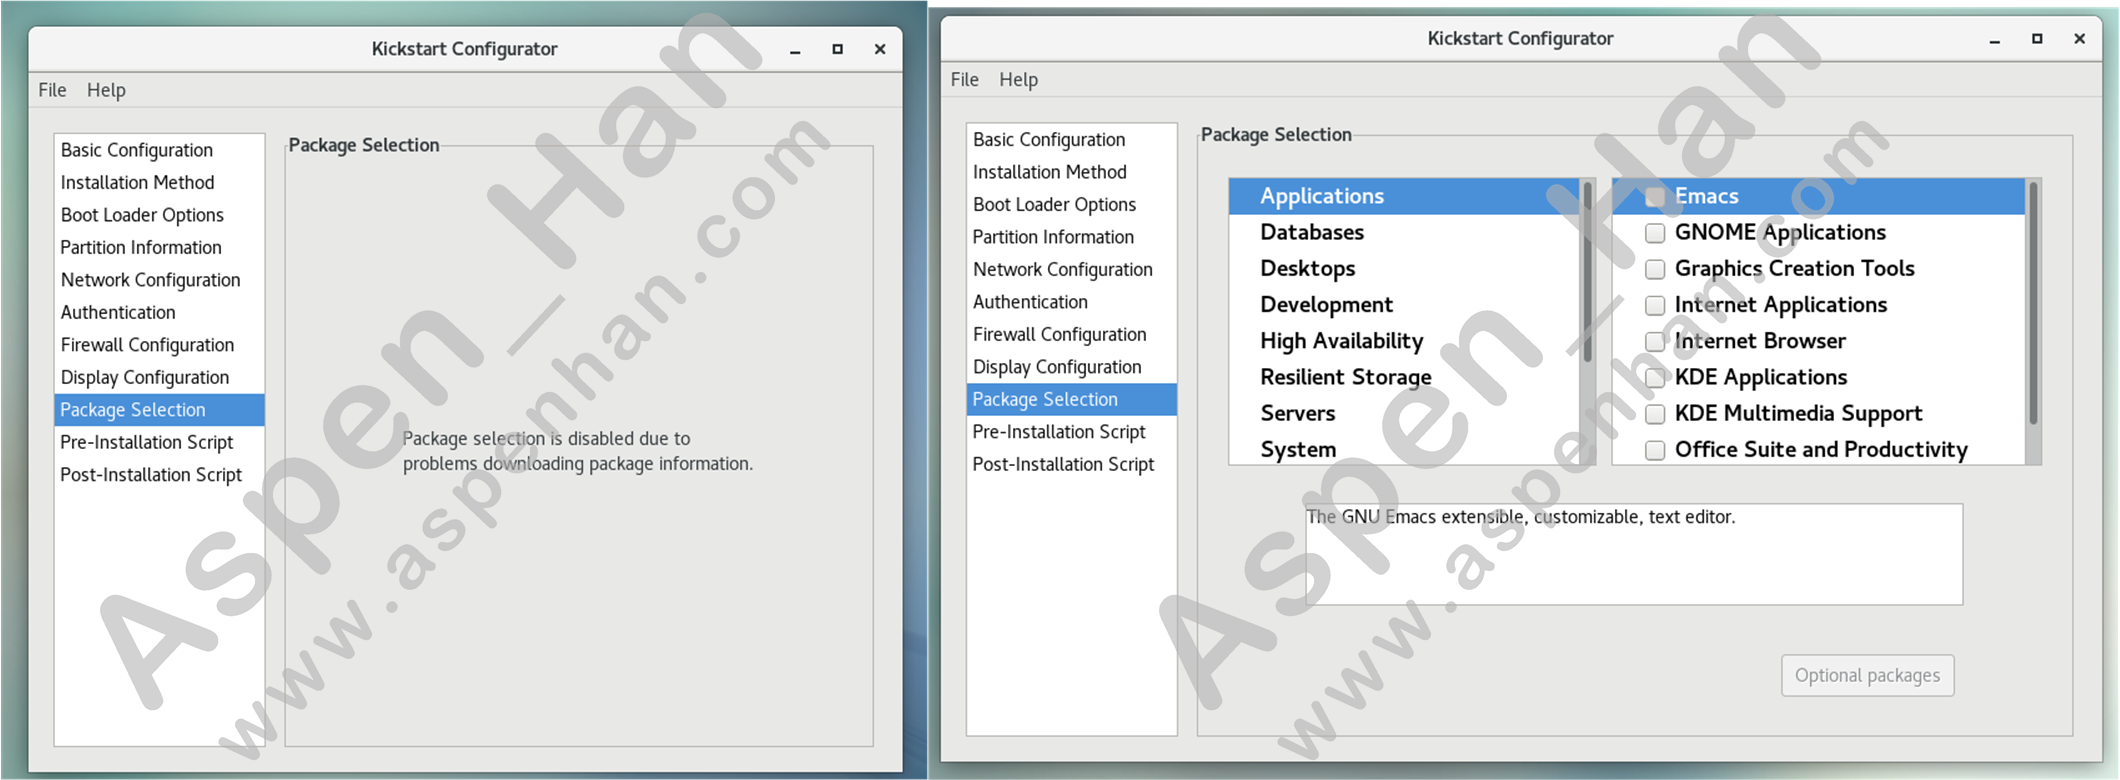
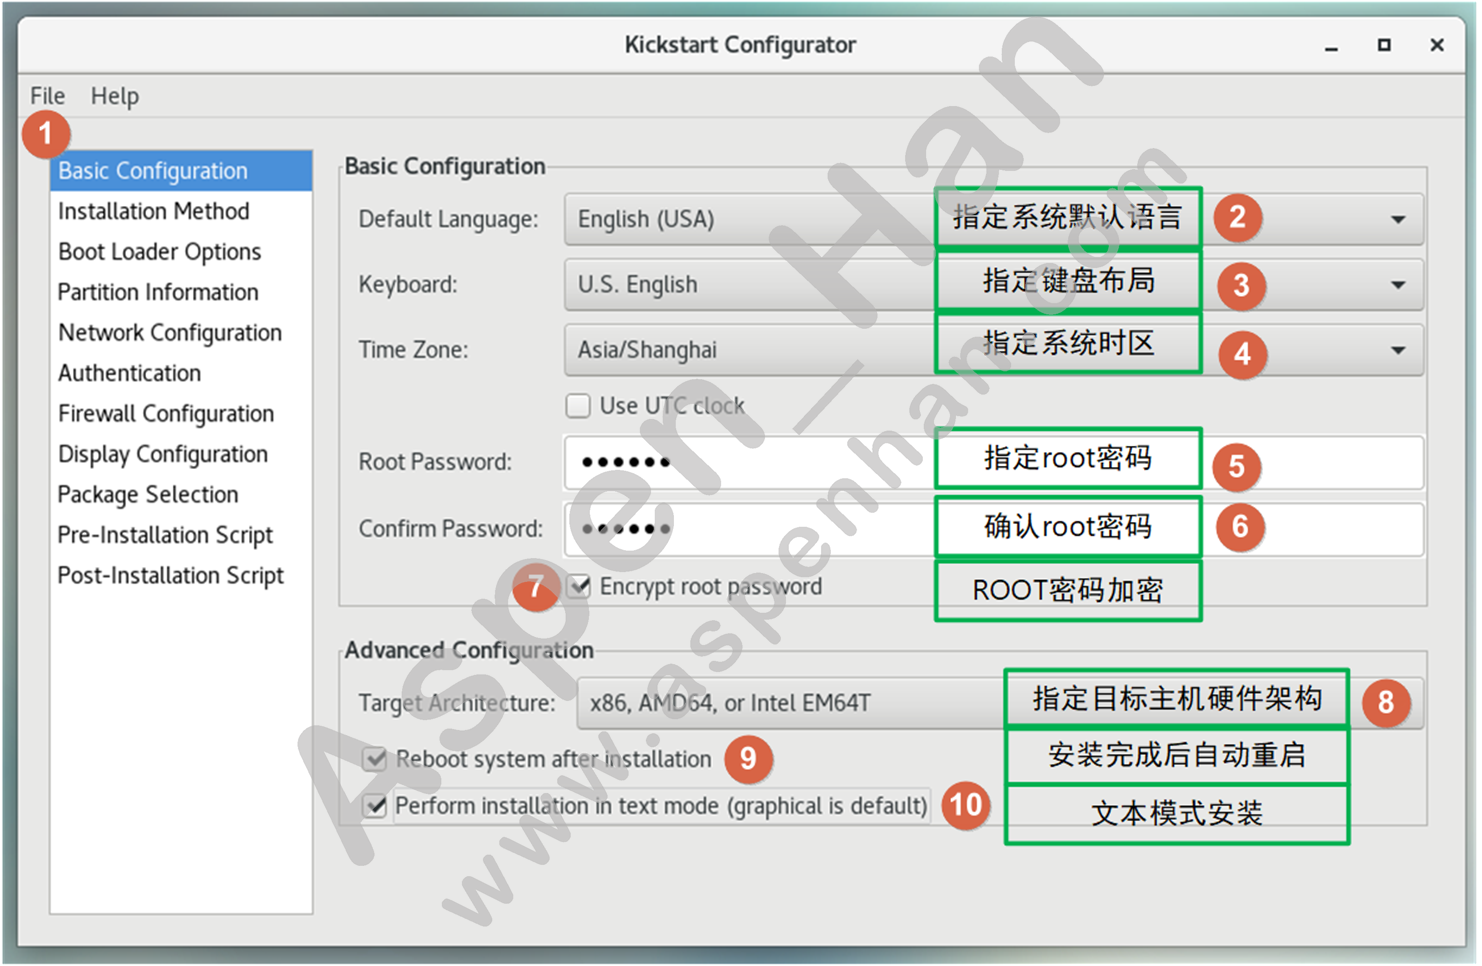
step 04 定义基本配置及硬件架构
step 05 指定应答文件获取方式、地址及目录

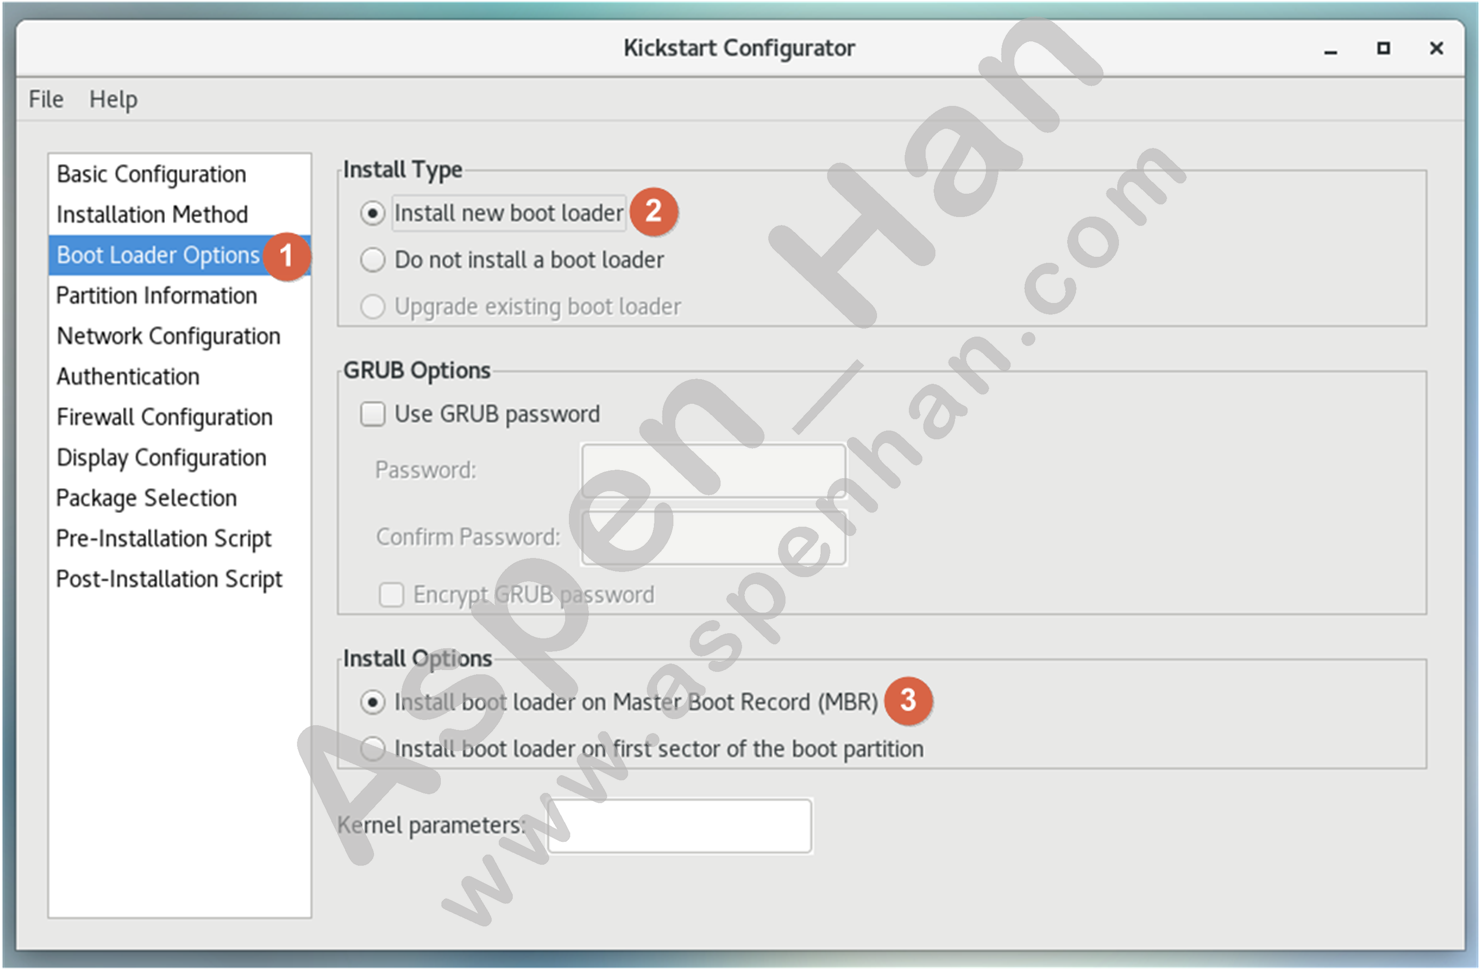
step 06 安装引导装载程序
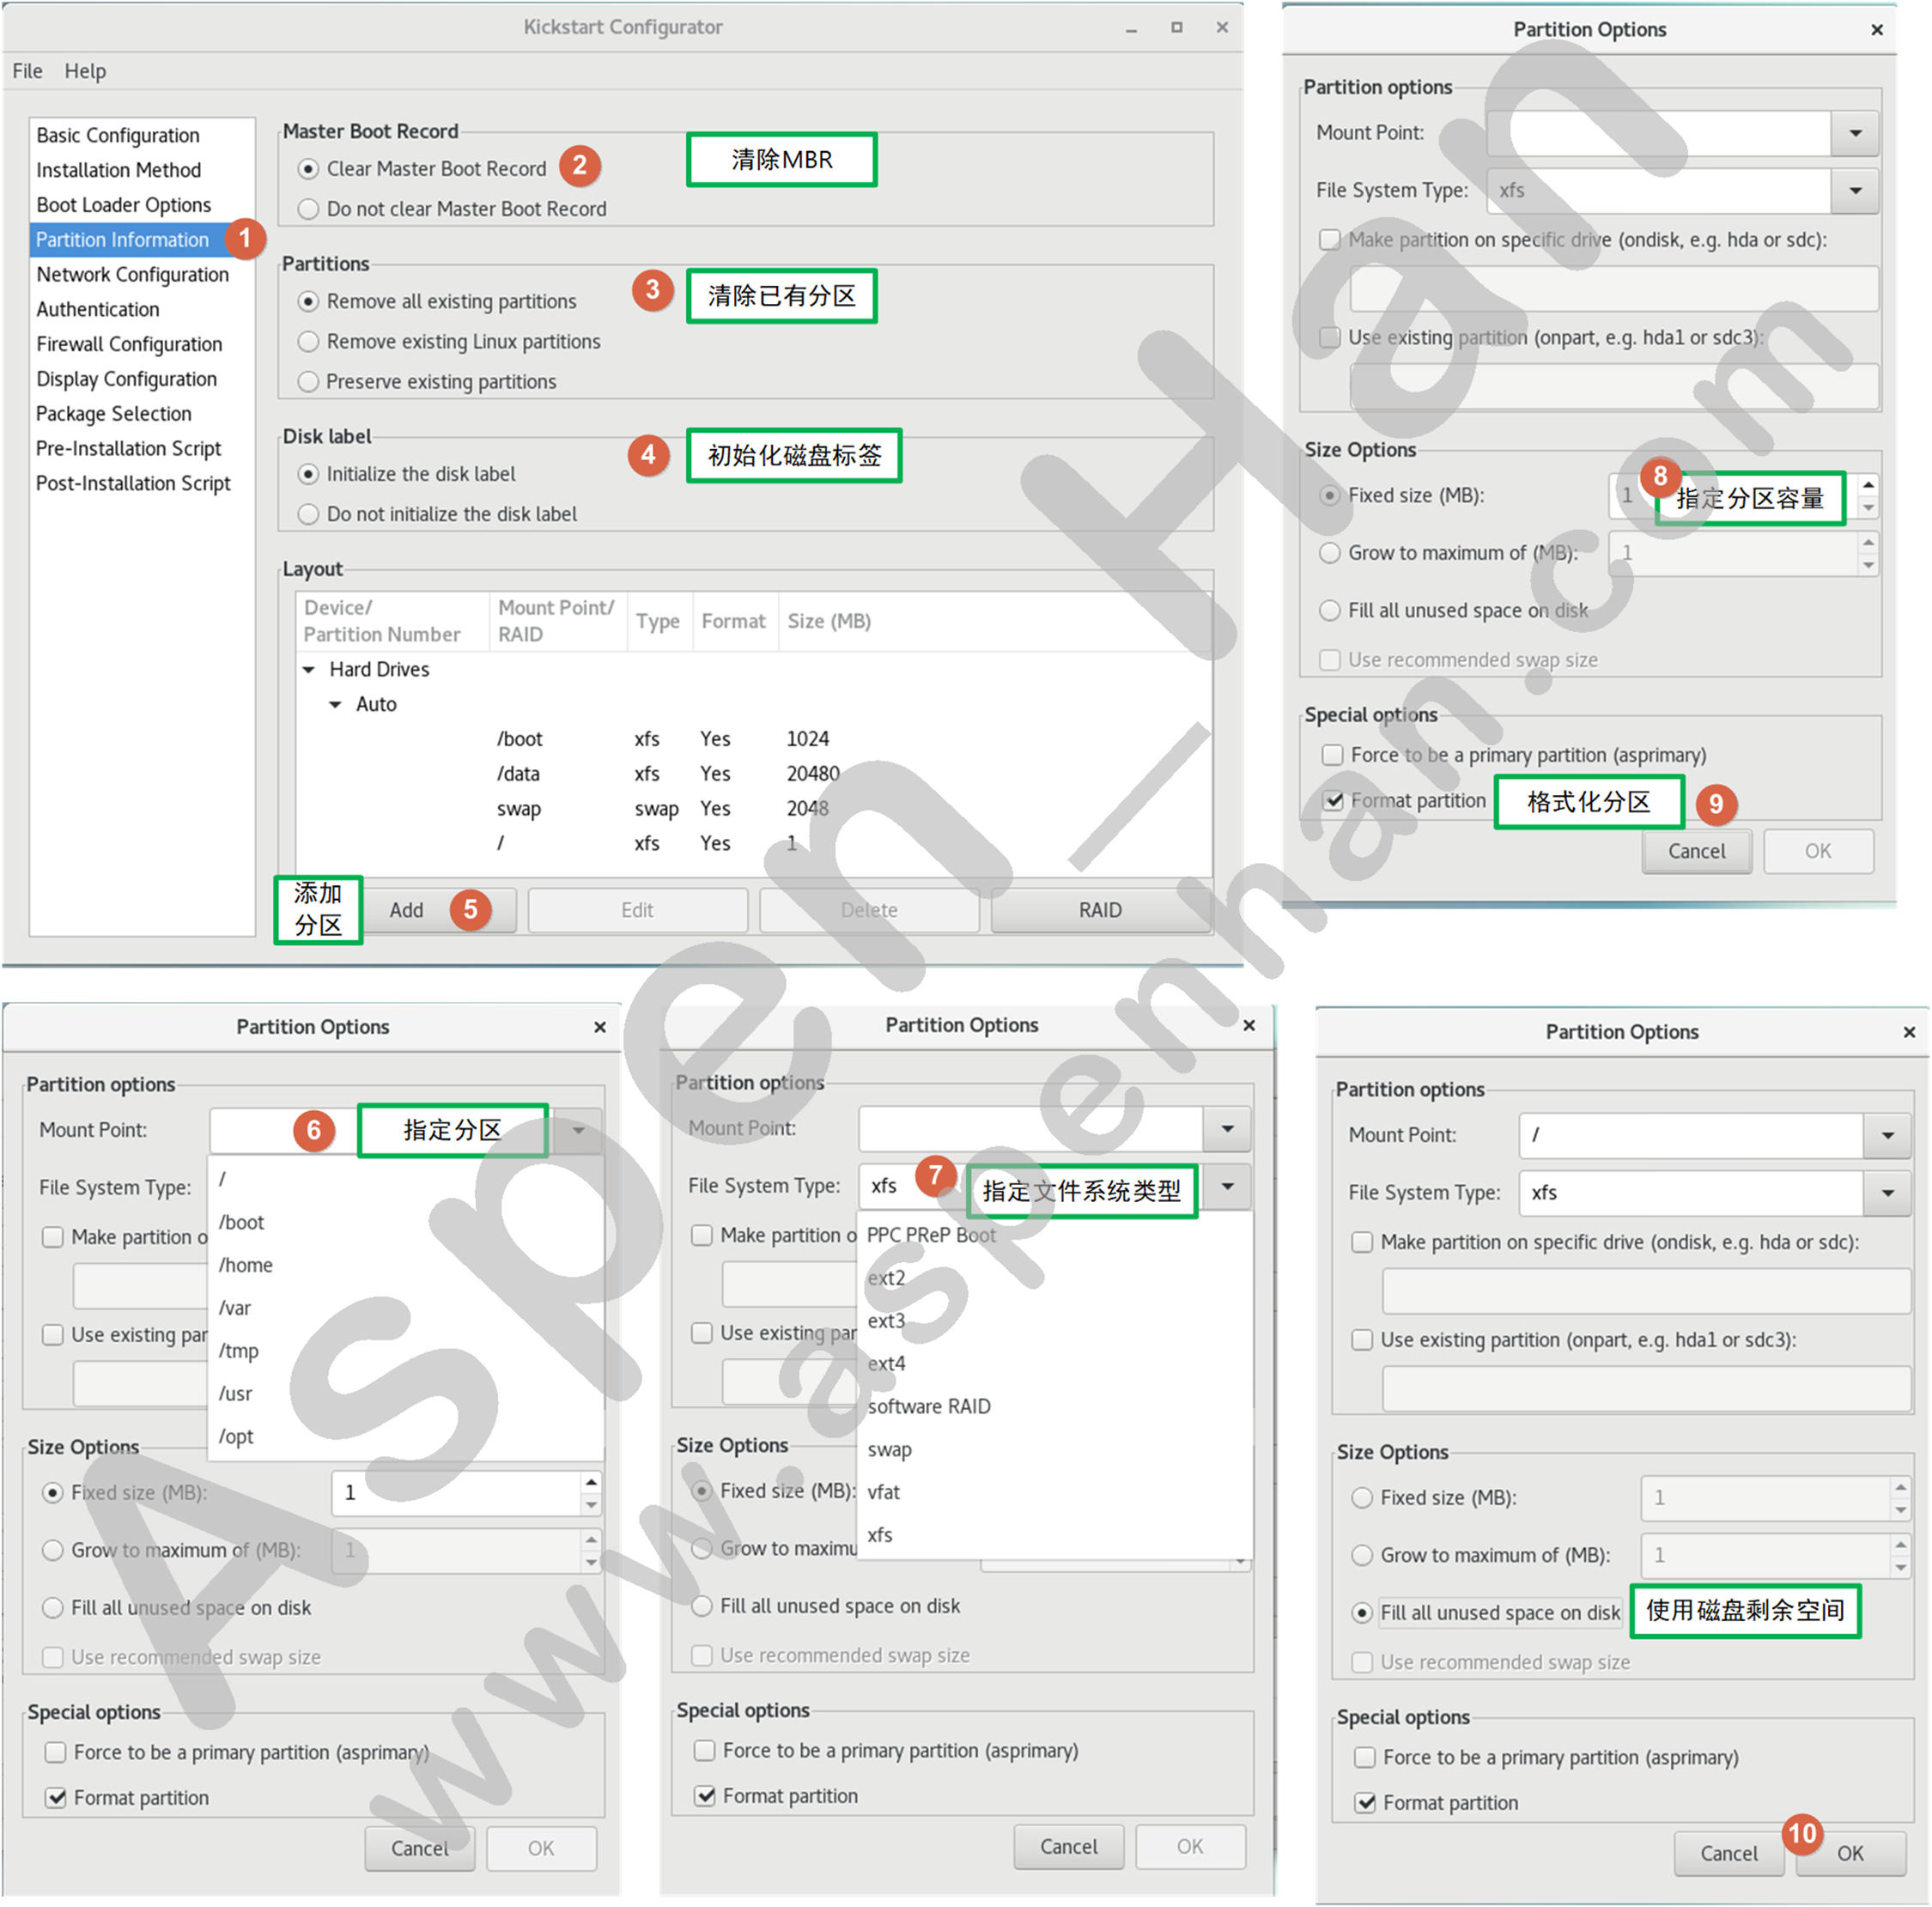
step 07 定制磁盘分区
step 08 配置网络

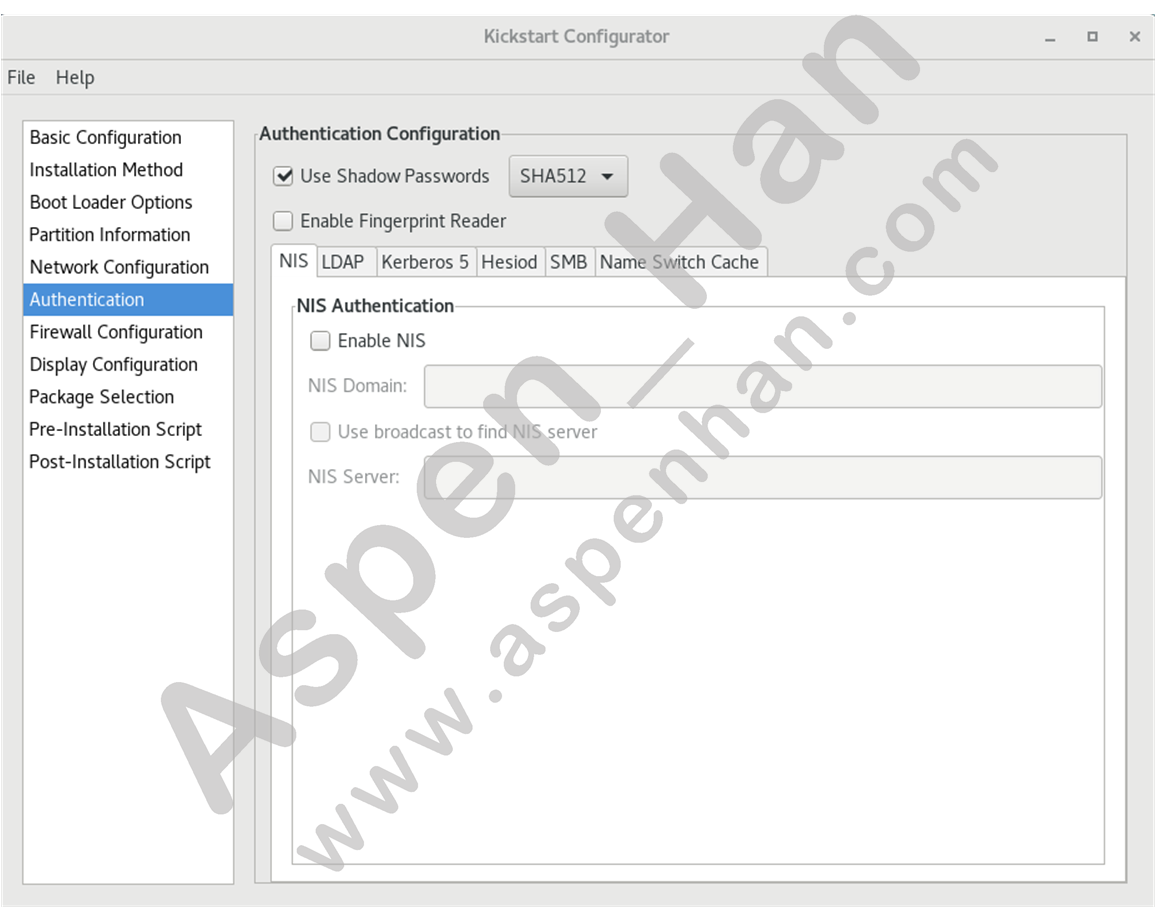
step 09 验证(保持默认;个人建议使用md5)
step 10 配置防火墙
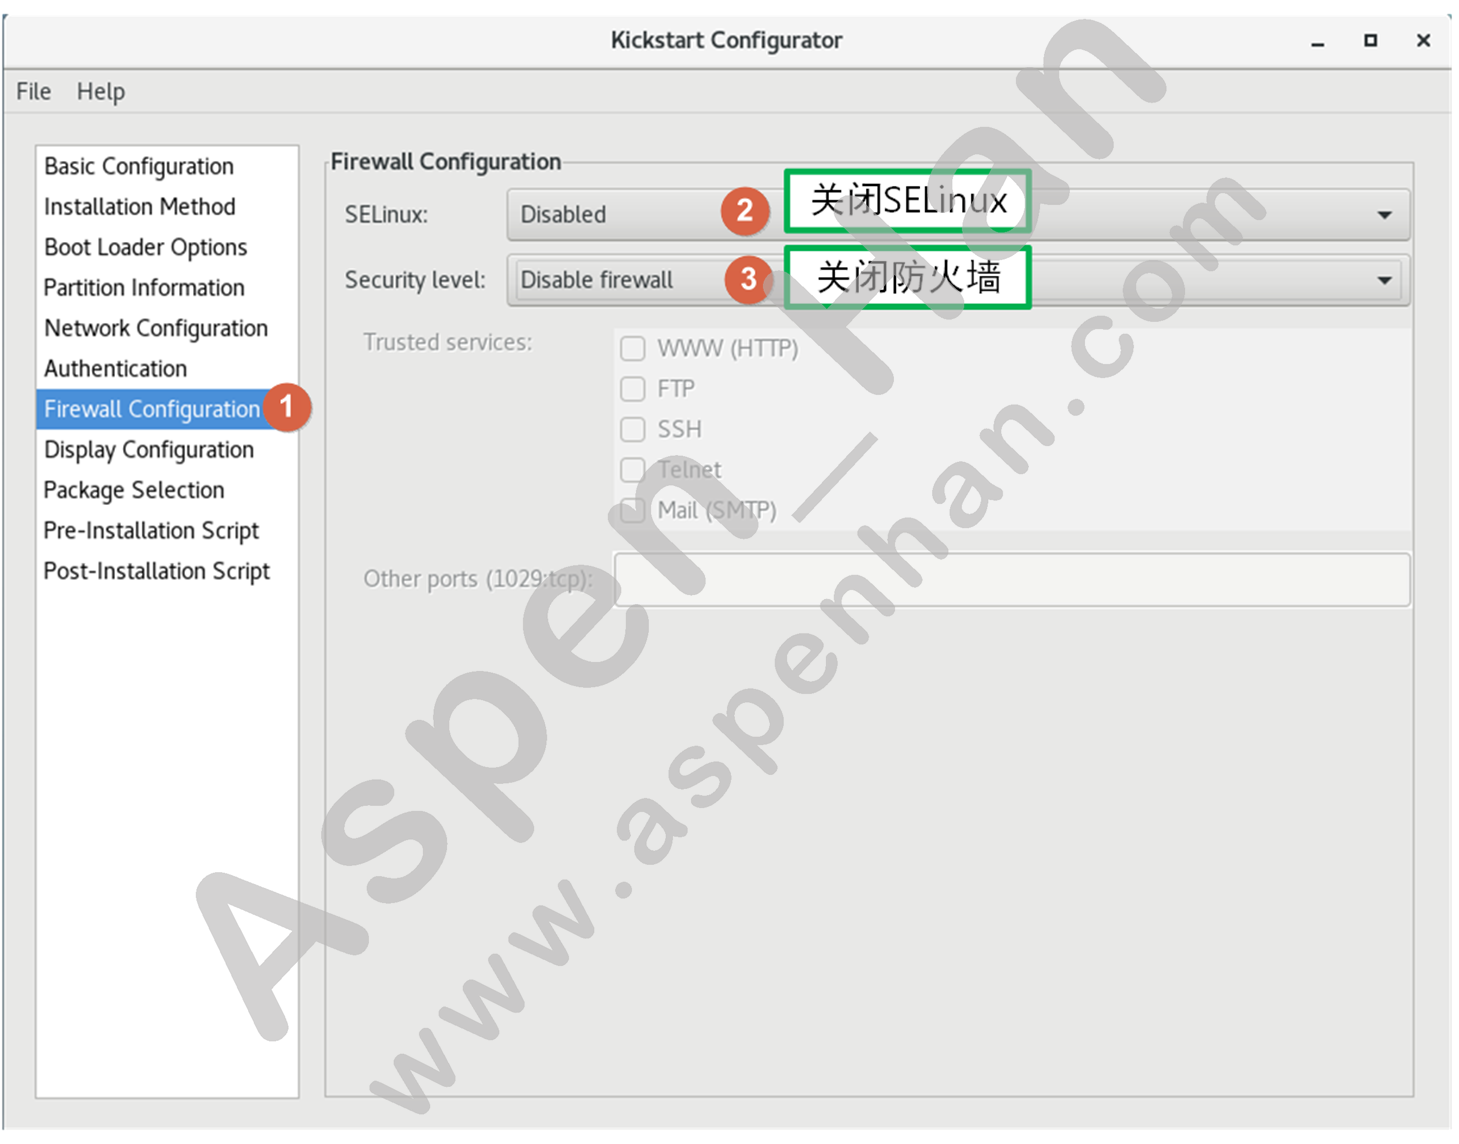
step 11 显示配置

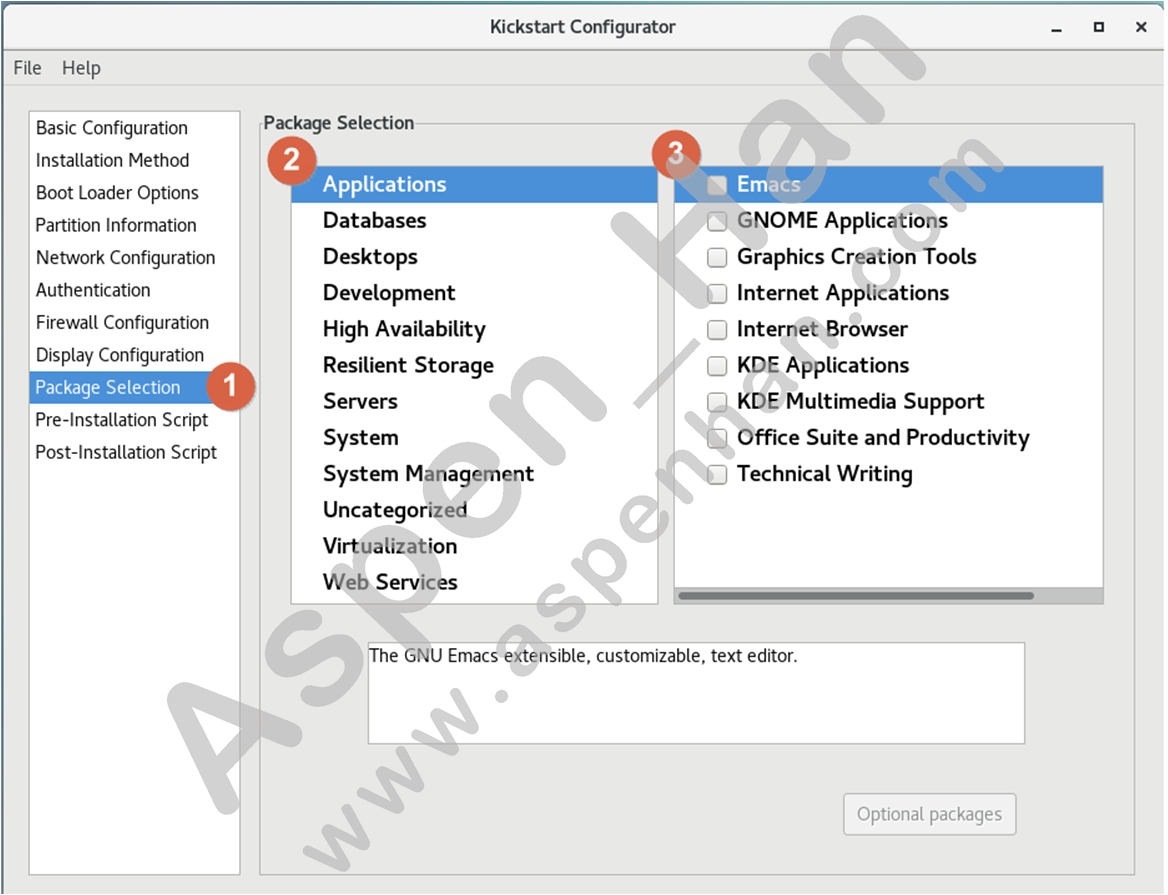
step 12 软件包选择
模板机推荐安装软件包
- Development -> Development Tools
- Servers -> System Administration Tools
- System -> Compatibility Libraries
- System -> Debugging Tools
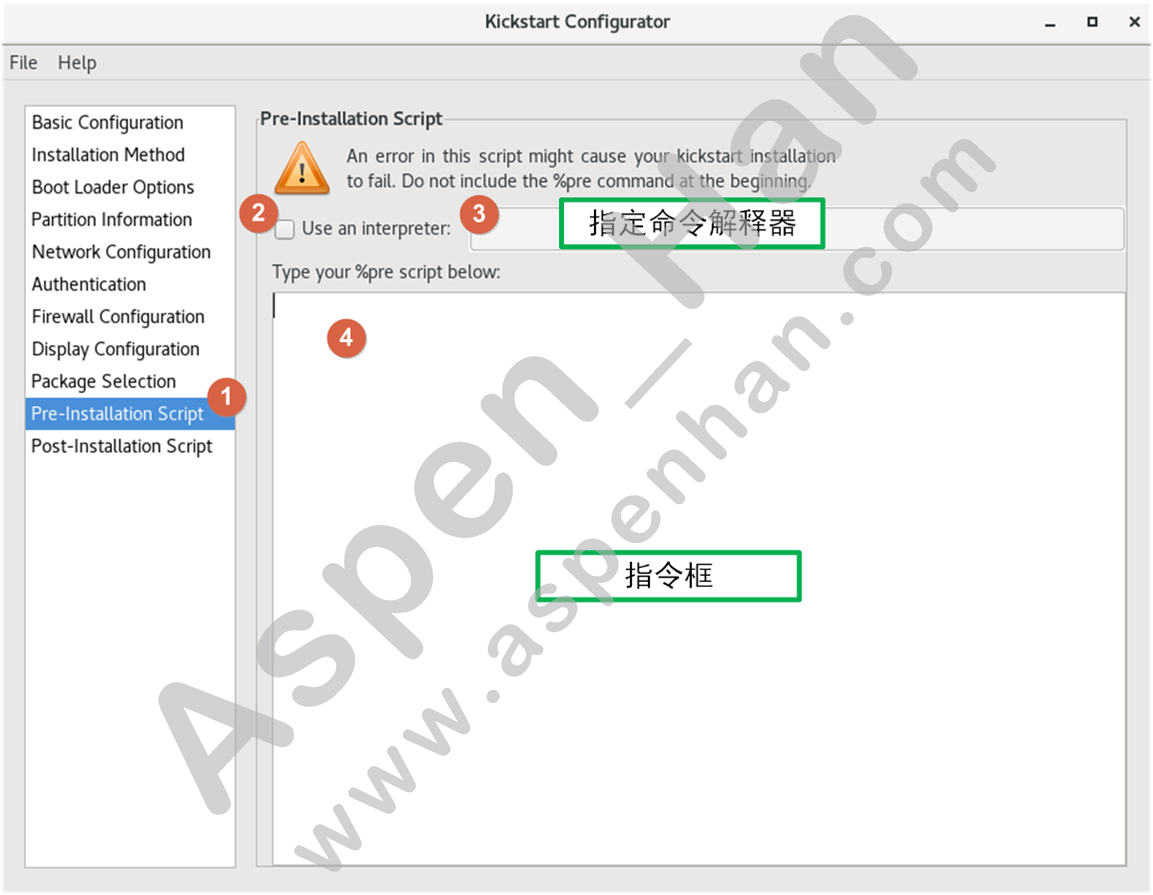
step 13 预安装脚本(根据需要配置)
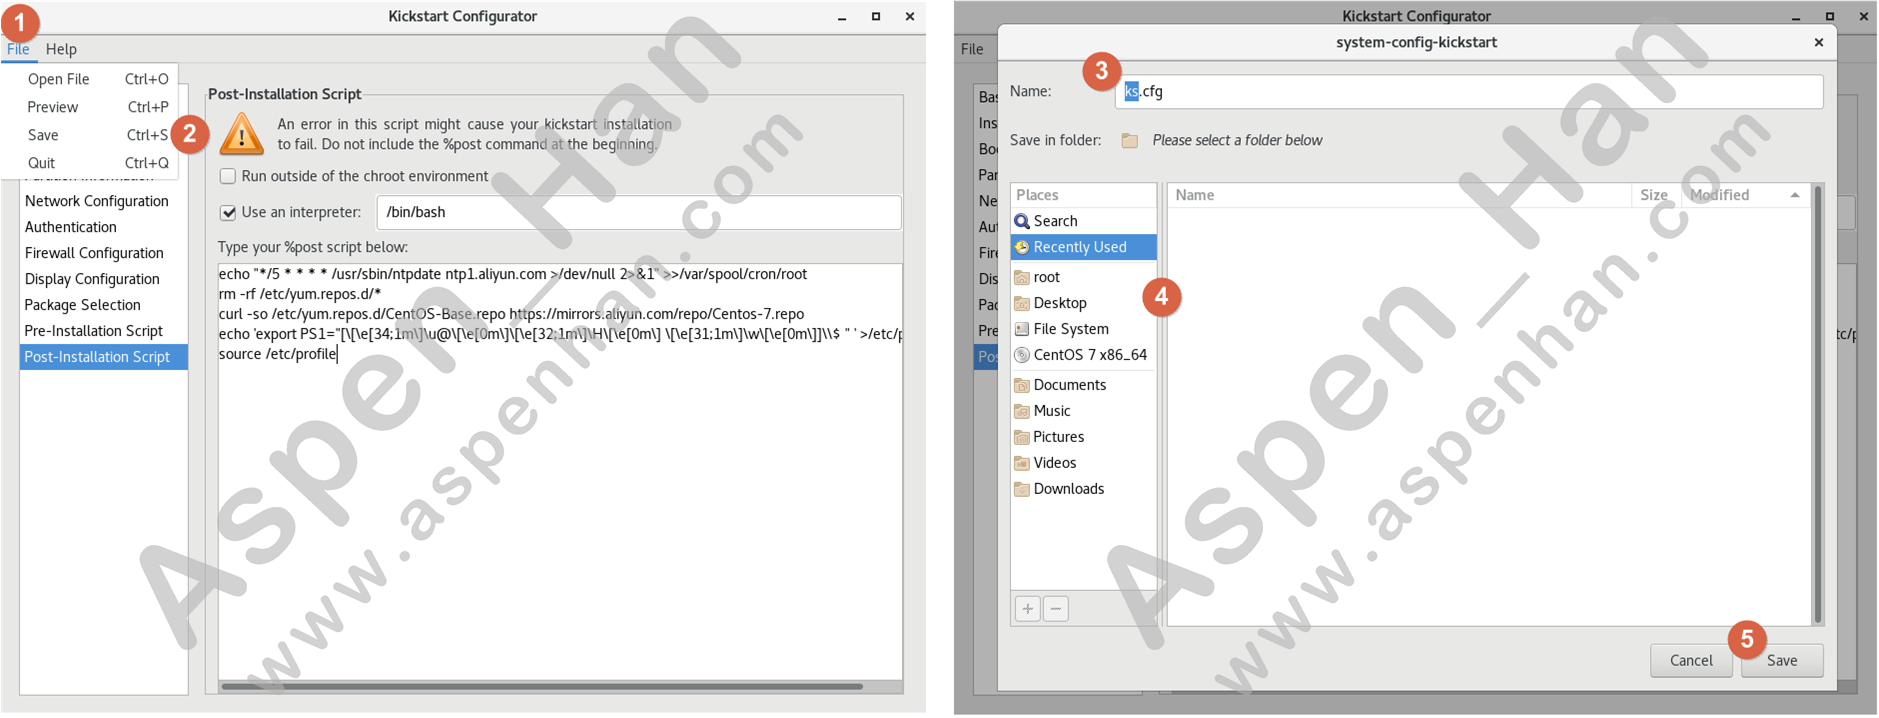
step 14 安装后脚本

step 15 保存配置文件
step 16 查看配置文件
[root@pxe ~]# cat CentOS-7-x86_64-ks.cfg
#platform=x86, AMD64, or Intel EM64T
#version=DEVEL
# Install OS instead of upgrade
install
# Keyboard layouts
keyboard 'us'
# Root password
rootpw --iscrypted $1$vaSlHHWy$gXZj/WByXvNCGEFoY6JON/
# System language
lang en_US
# System authorization information
auth  --useshadow  --passalgo=sha512
# Use text mode install
text
# SELinux configuration
selinux --disabled
# Do not configure the X Window System
skipx
# Firewall configuration
firewall --disabled
# Network information
network  --bootproto=dhcp --device=eth0
# Reboot after installation
reboot
# System timezone
timezone Asia/Shanghai
# Use network installation
url --url="http://https://10.0.0.110/cobbler/ks_mirror/CentOS-7-x86_64/"
# System bootloader configuration
bootloader --location=mbr
# Clear the Master Boot Record
zerombr
# Partition clearing information
clearpart --all --initlabel
# Disk partitioning information
part /boot --fstype="xfs" --size=1024
part /data --fstype="xfs" --size=20480
part swap --fstype="swap" --size=2048
part / --fstype="xfs" --grow --size=1

%post --interpreter=/bin/bash
echo "*/5 * * * * /usr/sbin/ntpdate ntp1.aliyun.com >/dev/null 2>&1" >>/var/spool/cron/root
rm -rf /etc/yum.repos.d/*
curl -so /etc/yum.repos.d/CentOS-Base.repo https://mirrors.aliyun.com/repo/Centos-7.repo
echo 'export PS1="[\[\e[34;1m\]\u@\[\e[0m\]\[\e[32;1m\]\H\[\e[0m\] \[\e[31;1m\]\w\[\e[0m\]]\\$ " ' >/etc/profile
source /etc/profile
%end

%packages
@compat-libraries
@debugging
@development
@system-admin-tools

%end
三、Cobbler
1. 功能
-
使用模板配置DHCP服务;
-
导入不同的操作系统;(使用yum或者rsync等存储库建立镜像或压缩媒介)
-
自动的在TFTP服务目录下创建适当的PXE文件;
-
自动重启DHCP服务(服务发生更改时 );
-
自动重装系统;
-
电源管理(调用IPMI)
2. 工作流程
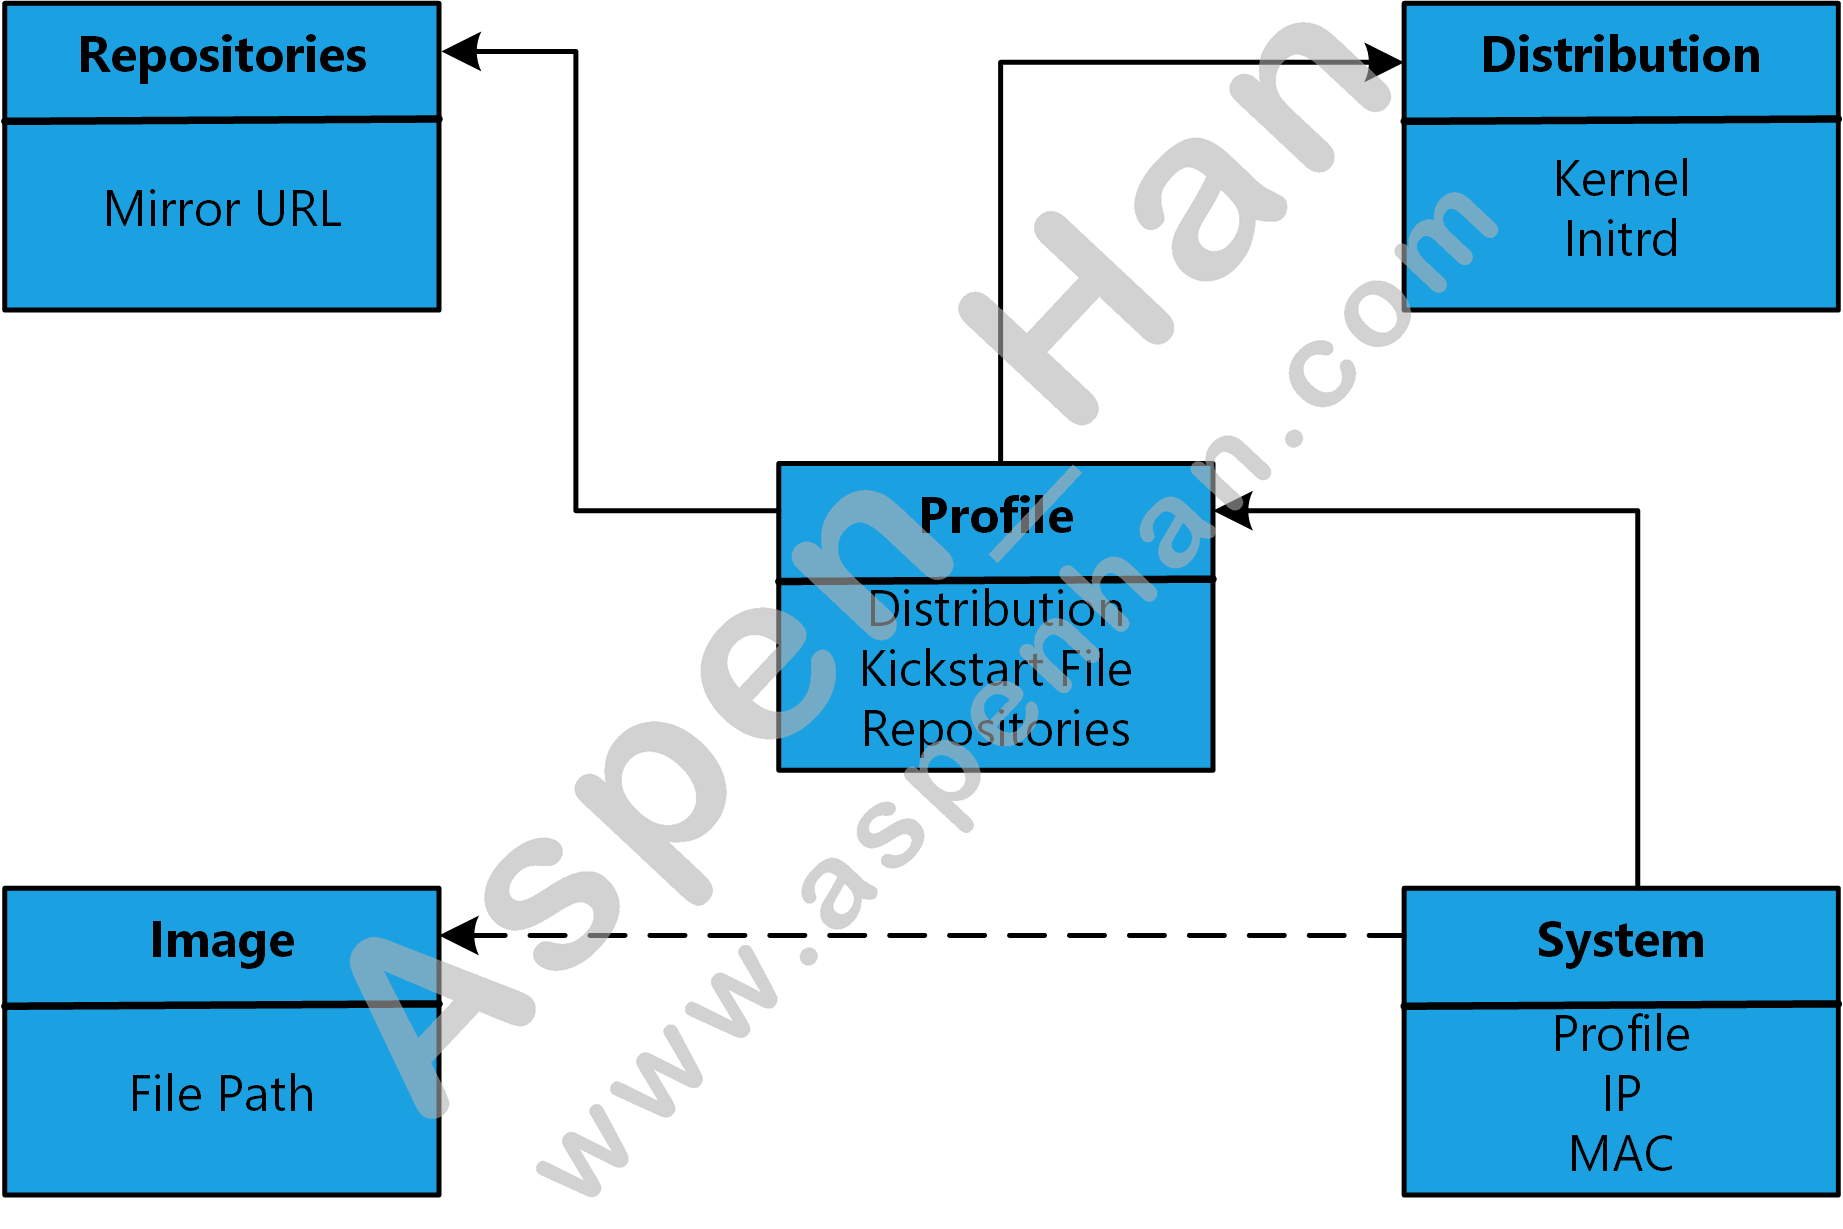
3. Cobbler核心文件
/var/www/cobbler
- ks_mirror - 系统镜像目录
- repo_mirror - 仓库镜像目录
/var/lib/cobbler
- kickstarts - kickstart配置文件目录
- loaders - 启动文件目录
- snippets - 服务脚本目录
/etc/cobbler
- settings - cobbler服务配置文件
- dhcp.template - DHCP服务管理配置文件
- dnsmasg.template - DNS服务管理配置文件
四、无人值守安装系统
1. 系统环境
- 实现环境:VMware Workstation 16 Pro
- 系统平台:CentOS 7.6
- 网络模式:NAT模式
- DHCP/TFTP地址:10.0.0.100
- HTTP/NFS/FTP地址:10.0.0.100
- Firewalld和Iptables:关闭
- SELINUX:禁用
[root@pxe ~]# uname -r
3.10.0-957.el7.x86_64
[root@pxe ~]# cat /etc/centos-release
CentOS Linux release 7.6.1810 (Core)
[root@pxe ~]# ip a show eth1 |sed -nr '3s#(.*et )(.*)(/24.*$)#\2#gp'
172.16.1.100
[root@pxe ~]# systemctl status firewalld.service | awk '/Active/'
   Active: inactive (dead)
[root@pxe ~]# systemctl status iptables.service | awk '/Active/'
Unit iptables.service could not be found.
[root@pxe ~]# getenforce
Disabled
2. 安装Cobbler
step 01 安装EPEL源
| 安装 Cobbler 需要依赖 EPEL 源; |
|
wget https://mirrors.aliyun.com/epel/epel-release-latest-7.noarch.rpm yum localinstall -y epel-release-latest-7.noarch.rpm |
[root@cobbler ~]# wget https://mirrors.aliyun.com/epel/epel-release-latest-7.noarch.rpm
--2022-04-05 10:29:53--  https://mirrors.aliyun.com/epel/epel-release-latest-7.noarch.rpm
......
2022-04-05 10:29:53 (162 KB/s) - ‘epel-release-latest-7.noarch.rpm’ saved [15608/15608]

[root@cobbler ~]# yum localinstall -y epel-release-latest-7.noarch.rpm
Loaded plugins: fastestmirror
......
Installed:
  epel-release.noarch 0:7-14

Complete!
[root@cobbler ~]# ll /etc/yum.repos.d/epel.repo
-rw-r--r--. 1 root root 664 Dec 26  2020 /etc/yum.repos.d/epel.repo
step 02 安装cobbler及各服务
| yum install -y httpd dhcp tftp pykickstart cobbler cobbler-web |
[root@cobbler ~]# yum install -y httpd dhcp pykickstart cobbler cobbler-web
Loaded plugins: fastestmirror
Determining fastest mirrors
 * base: mirrors.aliyun.com
 * extras: mirrors.aliyun.com
 * updates: mirrors.aliyun.com
......
Complete!
[root@cobbler ~]# ls /etc/httpd/conf.d/
autoindex.conf  cobbler.conf  cobbler_web.conf  README  ssl.conf  userdir.conf  welcome.conf
step 03 启动并检测cobbler
|
systemctl start httpd systemctl enable httpd systemctl enable cobblerd systemctl start cobblerd cobbler check |
[root@cobbler ~]# systemctl enable httpd
Created symlink from /etc/systemd/system/multi-user.target.wants/httpd.service to /usr/lib/systemd/system/httpd.service.
[root@cobbler ~]# systemctl start httpd
[root@cobbler ~]# systemctl enable cobblerd
Created symlink from /etc/systemd/system/multi-user.target.wants/cobblerd.service to /usr/lib/systemd/system/cobblerd.service.
[root@cobbler ~]# systemctl start cobblerd
[root@cobbler ~]# netstat -lntp | egrep "python|httpd"
tcp        0      0 127.0.0.1:25151         0.0.0.0:*               LISTEN      9755/python2
tcp6       0      0 :::80                   :::*                    LISTEN      9699/httpd
tcp6       0      0 :::443                  :::*                    LISTEN      9699/httpd
[root@cobbler ~]# cobbler check
The following are potential configuration items that you may want to fix:

1 : The 'server' field in /etc/cobbler/settings must be set to something other than localhost, or kickstarting features will not work.  This should be a resolvable hostname or IP for the boot server as reachable by all machines that will use it.
2 : For PXE to be functional, the 'next_server' field in /etc/cobbler/settings must be set to something other than 127.0.0.1, and should match the IP of the boot server on the PXE network.
3 : change 'disable' to 'no' in /etc/xinetd.d/tftp
4 : Some network boot-loaders are missing from /var/lib/cobbler/loaders.  If you only want to handle x86/x86_64 netbooting, you may ensure that you have installed a *recent* version of the syslinux package installed and can ignore this message entirely.  Files in this directory, should you want to support all architectures, should include pxelinux.0, menu.c32, elilo.efi, and yaboot.
5 : enable and start rsyncd.service with systemctl
6 : debmirror package is not installed, it will be required to manage debian deployments and repositories
7 : The default password used by the sample templates for newly installed machines (default_password_crypted in /etc/cobbler/settings) is still set to 'cobbler' and should be changed, try: "openssl passwd -1 -salt 'random-phrase-here' 'your-password-here'" to generate new one
8 : fencing tools were not found, and are required to use the (optional) power management features. install cman or fence-agents to use them

Restart cobblerd and then run 'cobbler sync' to apply changes.
3. 配置Cobbler
step 01 编辑cobbler配置文件
|
# /etc/cobbler/settings next_server: IP地址 #指定TFTP服务器地址(不能是127.0.0.1) server: IP地址 #指定cobbler服务器地址(不能是127.0.0.1) |
[root@cobbler ~]# grep -n '10.0.0.110'  /etc/cobbler/settings
278:next_server: 10.0.0.110
390:server: 10.0.0.110
step 02 编辑TFTP配置文件
|
#/etc/xinetd.d/tftp
service tftp
{
socket_type = dgram
protocol = udp
wait = yes
user = root
server = /usr/sbin/in.tftpd
server_args = -s /var/lib/tftpboot #指定TFTP服务器文件目录
disable = no
per_source = 11
cps = 100 2
flags = IPv4
}
|
[root@cobbler ~]# cat /etc/xinetd.d/tftp
# default: off
# description: The tftp server serves files using the trivial file transfer \
#   protocol.  The tftp protocol is often used to boot diskless \
#   workstations, download configuration files to network-aware printers, \
#   and to start the installation process for some operating systems.
service tftp
{
    socket_type     = dgram
    protocol        = udp
    wait            = yes
    user            = root
    server          = /usr/sbin/in.tftpd
    server_args     = -s /var/lib/tftpboot
    disable         = no
    per_source      = 11
    cps         = 100 2
    flags           = IPv4
}
step 03 获取网络安装的文件
|
cobbler get-loaders #部分版本支持 #替代解决方案 yum install -y syslinux cp /usr/share/syslinux/pxelinux.0 /var/lib/cobbler/loaders/ cp /usr/share/syslinux/menu.c32 /var/lib/cobbler/loaders/ |
[root@cobbler ~]# cobbler get-loaders
No such command: get-loaders
[root@cobbler ~]# yum install -y syslinux
Loaded plugins: fastestmirror
Loading mirror speeds from cached hostfile
 * base: mirrors.aliyun.com
 * extras: mirrors.aliyun.com
 * updates: mirrors.aliyun.com
Package syslinux-4.05-15.el7.x86_64 already installed and latest version
Nothing to do
[root@cobbler ~]# cp -rp /usr/share/syslinux/pxelinux.0 /var/lib/cobbler/loaders/
[root@cobbler ~]# cp -rp /usr/share/syslinux/menu.c32 /var/lib/cobbler/loaders/
step 04 启动rsync服务
|
systemctl start rsyncd systemctl enable rsyncd |
[root@cobbler ~]# systemctl enable rsyncd
Created symlink from /etc/systemd/system/multi-user.target.wants/rsyncd.service to /usr/lib/systemd/system/rsyncd.service.
[root@cobbler ~]# systemctl start rsyncd
[root@cobbler ~]# netstat -lntp | grep rsync
tcp        0      0 0.0.0.0:873             0.0.0.0:*               LISTEN      9974/rsync
tcp6       0      0 :::873                  :::*                    LISTEN      9974/rsync
step 05 生成随机密码(root密码)
| openssl passwd -1 -salt '随机码' '明文密码' |
[root@cobbler ~]# openssl passwd -1 -salt 'cobbler' 'cobbler'
$1$cobbler$M6SE55xZodWc9.vAKLJs6.
step 06 将密码写入cobbler配置文件
|
# /etc/cobbler/settings default_password_crypted: "密码密码" |
[root@cobbler ~]# vim /etc/cobbler/settings
[root@cobbler ~]# grep -n 'default_password_crypted' /etc/cobbler/settings
101:default_password_crypted: "$1$cobbler$M6SE55xZodWc9.vAKLJs6."
step 07 管理DHCP服务
|
# /etc/cobbler/settings
manage_dhcp: 1 #定义cobbler管理DHCP服务
#/etc/cobbler/dhcp.template
subnet 网络地址 netmask 掩码 { #指定子网段
option routers IP地址; #指定网关地址
option domain-name-servers IP地址; #指定DNS服务器地址
option subnet-mask 掩码;
range dynamic-bootp 起始地址 结束地址; #指定地址分配范围
default-lease-time 数字; #指定默认地址释放时间(单位:秒)
max-lease-time 数字; #指定最大地址占用时间(单位:秒)
next-server $next_server; #TFTP服务器地址
......
}
|
[root@cobbler ~]# vim /etc/cobbler/settings
[root@cobbler ~]# grep -n 'manage_dhcp:' /etc/cobbler/settings
242:manage_dhcp: 1
[root@cobbler ~]# vim /etc/cobbler/dhcp.template
[root@cobbler ~]# awk 'NR==21,NR==44' /etc/cobbler/dhcp.template
subnet 10.0.0.0 netmask 255.255.255.0 {
     option routers             10.0.0.254;
     option domain-name-servers 223.5.5.5;
     option subnet-mask         255.255.255.0;
     range dynamic-bootp        10.0.0.200 10.0.0.220;
     default-lease-time         21600;
     max-lease-time             43200;
     next-server                $next_server;
     class "pxeclients" {
          match if substring (option vendor-class-identifier, 0, 9) = "PXEClient";
          if option pxe-system-type = 00:02 {
                  filename "ia64/elilo.efi";
          } else if option pxe-system-type = 00:06 {
                  filename "grub/grub-x86.efi";
          } else if option pxe-system-type = 00:07 {
                  filename "grub/grub-x86_64.efi";
          } else if option pxe-system-type = 00:09 {
                  filename "grub/grub-x86_64.efi";
          } else {
                  filename "pxelinux.0";
          }
     }

}
step 08 重启cobbler服务
| systemctl restart cobblerd |
[root@cobbler ~]# systemctl restart cobblerd.service
[root@cobbler ~]# cobbler check
The following are potential configuration items that you may want to fix:

1 : Some network boot-loaders are missing from /var/lib/cobbler/loaders.  If you only want to handle x86/x86_64 netbooting, you may ensure that you have installed a *recent* version of the syslinux package installed and can ignore this message entirely.  Files in this directory, should you want to support all architectures, should include pxelinux.0, menu.c32, elilo.efi, and yaboot.
2 : debmirror package is not installed, it will be required to manage debian deployments and repositories
3 : fencing tools were not found, and are required to use the (optional) power management features. install cman or fence-agents to use them

Restart cobblerd and then run 'cobbler sync' to apply changes.
step 09 同步cobbler服务
| cobbler sync |
[root@cobbler ~]# cobbler sync
task started: 2022-04-05_132921_sync
task started (id=Sync, time=Tue Apr  5 13:29:21 2022)
......
running: service dhcpd restart
......
*** TASK COMPLETE ***
[root@cobbler ~]# head -7 /etc/dhcp/dhcpd.conf
# ******************************************************************
# Cobbler managed dhcpd.conf file
# generated from cobbler dhcp.conf template (Tue Apr  5 05:29:22 2022)
# Do NOT make changes to /etc/dhcpd.conf. Instead, make your changes
# in /etc/cobbler/dhcp.template, as /etc/dhcpd.conf will be
# overwritten.
# ******************************************************************
4. 使用cobbler安装系统
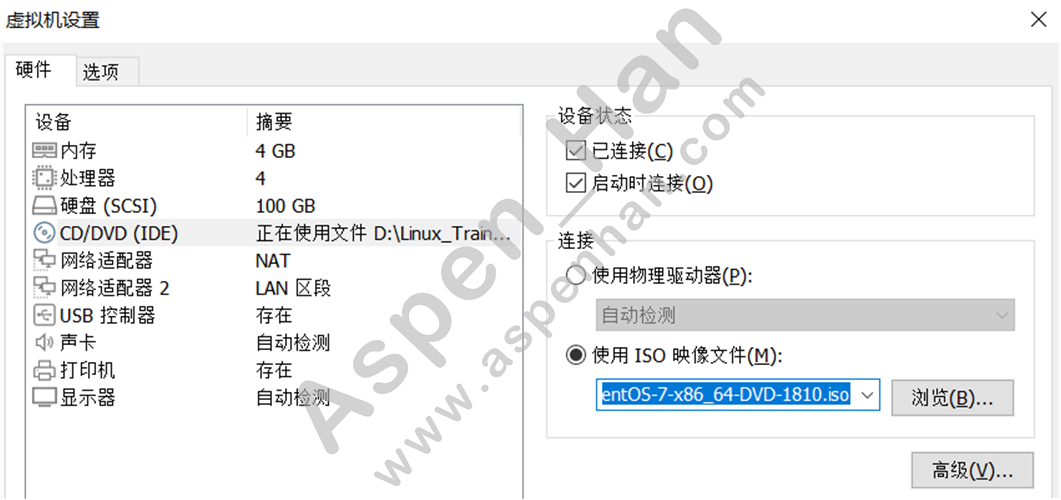
step 01 导入镜像
|
mount /dev/cdrom /挂载点 cobbler import --path=/镜像目录/ --name=镜像名称 --arch=系统架构 #镜像存储目录: /var/www/cobbler/ks_mirror |
[root@cobbler ~]# cobbler import --path=/mnt/ --name=CentOS-7-x86_64 --arch=x86_64
task started: 2022-04-05_134351_import
task started (id=Media import, time=Tue Apr  5 13:43:51 2022)
......
*** TASK COMPLETE ***
[root@cobbler ~]# ll /var/www/cobbler/ks_mirror/
total 0
drwxrwxr-x 8 root root 254 Nov 26  2018 CentOS-7-x86_64
drwxr-xr-x 2 root root  34 Apr  5 13:46 config
[root@cobbler ~]# cobbler profile list
   CentOS-7-x86_64
step 02 创建kickstart配置文件
# CentOS 7示例文件
# Kickstart Configuration for cobbler by Young Han
# Platform=x86, AMD64, or Intel EM64T
# System language
lang en_US
# System keyboard
keyboard us
# System timezone
timezone Asia/Shanghai
# Root password
rootpw --iscrypted $default_password_crypted
# Use text mode install
text
# Install OS instead of upgrade
install
# Use NFS installation Media
url --url=$tree
# System bootloader configuration
bootloader --location=mbr
# Clear the Master Boot Record
zerombr
#Partition clearing information
clearpart --all --initlabel
# Disk partitioning information
part /boot --fstype xfs --size 1024 --ondisk sda
part swap --size 16384 --ondisk sda
part / --fstype xfs --size 1 --grow --ondisk sda
# System authorization information
auth --useshadow --enablemd5
# Network information
$SNIPPET('network_config')
# network --bootproto=dhcp --device=eth0 --onboot=on
# Reboot after installation
reboot
# Firewall configuration
firewall --disabled
# SELinux configuration
selinux --disabled
#Do not configure X windows
skipx
#Package install information
%pre
$SNIPPET('log_ks_pre')
$SNIPPET('kickstart_start')
$SNIPPET('pre_install_network_config')
# Enable installation monitoring
$SNIPPET('pre_anamon')
%end

%packages
@base
@core
sysstat
iptraf
ntp
lrzsz
ncurses-devel
openssl-devel
zlib-devel
OpenIPMI-tools
mysql
nmap
screen
%end

%post
systemctl disable postfix.service
$yum_config_stanza
%end
[root@cobbler ~]# cd /var/lib/cobbler/kickstarts/
[root@cobbler /var/lib/cobbler/kickstarts]# rz
[root@cobbler /var/lib/cobbler/kickstarts]# ll CentOS-7-x86_64.cfg
-rw-r--r-- 1 root root 1436 Apr 5 14:14 CentOS-7-x86_64.cfgstep 03 指定镜像kickstart配置文件
| cobbler profile edit --name=镜像文件 --kickstart=配置文件路径 #为镜像指定kickstart配置文件 |
[root@cobbler /var/lib/cobbler/kickstarts]# cobbler profile report| grep kickstart
Kickstart                      : /var/lib/cobbler/kickstarts/sample_end.ks
[root@cobbler /var/lib/cobbler/kickstarts]# cobbler profile edit --name=CentOS-7-x86_64 --kickstart=/var/lib/cobbler/kickstarts/CentOS-7-x86_64.cfg
[root@cobbler /var/lib/cobbler/kickstarts]# cobbler profile report| grep kickstart
Kickstart                      : /var/lib/cobbler/kickstarts/CentOS-7-x86_64.cfg
step 04 修正网卡名称(CentOS-7 添加内核参数)
|
cobbler profile edit --name=镜像文件 --kopts='net.ifnames=0 biosdevname=0' #添加内核参数 cobbler sync |
[root@cobbler /var/lib/cobbler/kickstarts]# cobbler profile report| grep 'Kernel Options'
Kernel Options                 : {}
Kernel Options (Post Install)  : {}
[root@cobbler /var/lib/cobbler/kickstarts]# cobbler profile edit --name=CentOS-7-x86_64 --kopts='net.ifnames=0 biosdevname=0'
[root@cobbler /var/lib/cobbler/kickstarts]# cobbler profile report| grep 'Kernel Options'
Kernel Options                 : {'biosdevname': '0', 'net.ifnames': '0'}
Kernel Options (Post Install)  : {}
[root@cobbler /var/lib/cobbler/kickstarts]# cobbler sync
task started: 2022-04-05_145130_sync
task started (id=Sync, time=Tue Apr  5 14:51:30 2022)
......
*** TASK COMPLETE ***
step 05 启动xinetd服务
xinetd服务主要用于管理tftp服务器
|
yum install -y xinetd systemctl start xinetd systemctl enable xinetd systemctl enable dhcpd |
[root@cobbler /var/lib/cobbler/kickstarts]# yum install xinetd.x86_64 -y
Loaded plugins: fastestmirror
Loading mirror speeds from cached hostfile
......
Complete!
[root@cobbler /var/lib/cobbler/kickstarts]# systemctl start xinetd.service
[root@cobbler /var/lib/cobbler/kickstarts]# systemctl enable xinetd.service
[root@cobbler ~]# systemctl enable dhcpd
Created symlink from /etc/systemd/system/multi-user.target.wants/dhcpd.service to /usr/lib/systemd/system/dhcpd.service.
step 06 测试安装系统
5. 自定义cobbler
自定义引导界面
|
#/etc/cobbler/pxe/pxedefault.template
DEFAULT menu
PROMPT 0
MENU TITLE 内容 #自定义引导菜单表头内容
TIMEOUT 200
TOTALTIMEOUT 6000
ONTIMEOUT $pxe_timeout_profile
LABEL local
MENU LABEL (local)
MENU DEFAULT
LOCALBOOT -1
$pxe_menu_items
MENU end
执行cobbler同步
cobbler sync |
[root@cobbler /etc/cobbler]# cat /etc/cobbler/pxe/pxedefault.template
DEFAULT menu
PROMPT 0
MENU TITLE Cobbler by Young | https://www.aspenhan.com
TIMEOUT 200
TOTALTIMEOUT 6000
ONTIMEOUT $pxe_timeout_profile

LABEL local
        MENU LABEL (local)
        MENU DEFAULT
        LOCALBOOT -1

$pxe_menu_items

MENU end
[root@cobbler /etc/cobbler]# cobbler sync
task started: 2022-04-06_111642_sync
task started (id=Sync, time=Wed Apr  6 11:16:42 2022)
......
*** TASK COMPLETE ***
构建自定义YUM源
|
cobbler repo add --name=仓库名称 --mirror=仓库链接 --arch=架构 --breed=yum #添加repo cobbler reposync #同步repo cobbler profile edit --name=镜像名称 --repos="仓库名称" #添加repo至对应的配置文件中 #修改kickstart配置文件 %post $yum_config_stanza %end echo "00 03 * * * /usr/bin/cobbler reposync --tries=3 --no-fail &>/dev/null">>/var/spool/cron/root 添加定时任务,定期同步repo |
[root@cobbler /etc/cobbler]# cobbler repo add --name=openstack-queens --mirror=https://mirrors.aliyun.com/centos/7/cloud/x86_64/openstack-queens/  --arch=x86_64 --breed=yum
[root@cobbler /etc/cobbler]# cobbler reposync
task started: 2022-04-07_161257_reposync
task started (id=Reposync, time=Thu Apr  7 16:12:57 2022)
hello, reposync
run, reposync, run!
creating: /var/www/cobbler/repo_mirror/openstack-queen/config.repo
creating: /var/www/cobbler/repo_mirror/openstack-queen/.origin/openstack-queen.repo
......
received on stdout:
received on stderr:
*** TASK COMPLETE ***
[root@cobbler /etc/cobbler]# cobbler profile edit --name=CentOS-7-x86_64 --repos=openstack-queens
[root@cobbler /etc/cobbler]# cobbler profile report |egrep -i 'repos'
Repos                          : ['openstack-queens']
[root@cobbler /etc/cobbler]# grep -A3 '%post' /var/lib/cobbler/kickstarts/CentOS-7-x86_64.cfg
%post
systemctl disable postfix.service
$yum_config_stanza
%end
[root@cobbler /etc/cobbler]# echo "00 03 * * * /usr/bin/cobbler reposync --tries=3 --no-fail &>/dev/null" >>/var/spool/cron/root
[root@cobbler /etc/cobbler]# crontab -l
#sync time by Aspen 20190511
*/5 * * * * /usr/sbin/ntpdate ntp1.aliyun.com >/dev/null 2>&1
00 03 * * * /usr/bin/cobbler reposync --tries=3 --no-fail &>/dev/null
自定义安装系统
| cobbler system add --name=名称 --mac=MAC地址(冒号分隔) --profile=镜像名称 --ip-address=IP地址 --subnet=子网掩码 --gateway=网关 --interface=网卡名称 --static=1 --hostname=主机名称 --name-servers="DNS地址" --kickstart=配置文件路径 |
[root@cobbler ~]# cobbler system add --name=linux-node2 --mac=00:0C:29:E2:F5:80 --profile=CentOS-7-x86_64 \
> --ip-address=10.0.0.111 --subnet=255.255.255.0 --gateway=10.0.0.254  --interface=eth0 --static=1 \
> --hostname=Linux-node2 --name-servers="10.0.0.254" \
> --kickstart=/var/lib/cobbler/kickstarts/CentOS-7-x86_64.cfg

# 等待装机完成
[root@cobbler ~]# ssh root@10.0.0.111
The authenticity of host '10.0.0.111 (10.0.0.111)' can't be established.
ECDSA key fingerprint is SHA256:EmCrOvX4inM+Xt5BxXTvMTGTYKHN9ZFjcNG+kQYtMlc.
ECDSA key fingerprint is MD5:74:10:0a:10:a6:a2:b5:42:a1:26:d2:62:77:e4:cf:8a.
Are you sure you want to continue connecting (yes/no)? yes
Warning: Permanently added '10.0.0.111' (ECDSA) to the list of known hosts.
root@10.0.0.111's password:
[root@Linux-node2 ~]# ifconfig eth0
eth0: flags=4163<UP,BROADCAST,RUNNING,MULTICAST>  mtu 1500
        inet 10.0.0.111  netmask 255.255.255.0  broadcast 10.0.0.255
        inet6 fe80::20c:29ff:fee2:f580  prefixlen 64  scopeid 0x20<link>
        ether 00:0c:29:e2:f5:80  txqueuelen 1000  (Ethernet)
        RX packets 186  bytes 17215 (16.8 KiB)
        RX errors 0  dropped 0  overruns 0  frame 0
        TX packets 97  bytes 11244 (10.9 KiB)
        TX errors 0  dropped 0 overruns 0  carrier 0  collisions 0
6. 使用koan自动重装系统
在客户机执行以下命令重装系统
step 01 安装koan工具
| yum install -y koan |
[root@localhost ~]# curl -o /etc/yum.repos.d/CentOS-Base.repo https://mirrors.aliyun.com/repo/Centos-7.repo
  % Total    % Received % Xferd  Average Speed   Time    Time     Time  Current
                                 Dload  Upload   Total   Spent    Left  Speed
100  2523  100  2523    0     0   4215      0 --:--:-- --:--:-- --:--:--  4212
[root@localhost ~]# wget -O /etc/yum.repos.d/epel.repo http://mirrors.aliyun.com/repo/epel-7.repo
--2022-04-06 09:25:58--  http://mirrors.aliyun.com/repo/epel-7.repo
Resolving mirrors.aliyun.com (mirrors.aliyun.com)... 117.161.69.114, 117.161.69.116, 117.161.69.113, ...
Connecting to mirrors.aliyun.com (mirrors.aliyun.com)|117.161.69.114|:80... connected.
HTTP request sent, awaiting response... 200 OK
Length: 664 [application/octet-stream]
Saving to: ‘/etc/yum.repos.d/epel.repo’

100%[=======================================================================================>] 664         --.-K/s   in 0s

2022-04-06 09:25:58 (182 MB/s) - ‘/etc/yum.repos.d/epel.repo’ saved [664/664]
[root@localhost ~]# yum install -y koan
Loaded plugins: fastestmirror, langpacks
Determining fastest mirrors
......
Complete!
step 02 查看koan可重装系统列表
| koan --server=Cobbler服务IP地址 --list=profiles |
[root@localhost ~]# koan --server=10.0.0.110 --list=profiles
- looking for Cobbler at http://10.0.0.110:80/cobbler_api
CentOS-7-x86_64
step 03 使用koan重装系统
| koan --replace-self --server=Cobbler服务IP地址 --profile=系统镜像名称 |
[root@localhost ~]# koan --server=10.0.0.110 --list=profiles
- looking for Cobbler at http://10.0.0.110:80/cobbler_api
CentOS-7-x86_64
[root@localhost ~]# koan --replace-self --server=10.0.0.110 --profile=CentOS-7-x86_64
- looking for Cobbler at http://10.0.0.110:80/cobbler_api
- reading URL: http://10.0.0.110/cblr/svc/op/ks/profile/CentOS-7-x86_64
install_tree: http://10.0.0.110/cblr/links/CentOS-7-x86_64
downloading initrd initrd.img to /boot/initrd.img_koan
url=http://10.0.0.110/cobbler/images/CentOS-7-x86_64/initrd.img
- reading URL: http://10.0.0.110/cobbler/images/CentOS-7-x86_64/initrd.img
downloading kernel vmlinuz to /boot/vmlinuz_koan
url=http://10.0.0.110/cobbler/images/CentOS-7-x86_64/vmlinuz
- reading URL: http://10.0.0.110/cobbler/images/CentOS-7-x86_64/vmlinuz
- ['/sbin/grubby', '--add-kernel', '/boot/vmlinuz_koan', '--initrd', '/boot/initrd.img_koan', '--args', '"ksdevice=link lang= text net.ifnames=0 ks=http://10.0.0.110/cblr/svc/op/ks/profile/CentOS-7-x86_64 biosdevname=0 kssendmac "', '--copy-default', '--make-default', '--title=kick1649208564']
- ['/sbin/grubby', '--update-kernel', '/boot/vmlinuz_koan', '--remove-args=root']
- reboot to apply changes
[root@localhost ~]# reboot
7. API接口
API 访问地址:http://localhost:25151
| 老版本API信息存在cobbler_web.conf文件; |
[root@cobbler ~]# grep 'api' /etc/httpd/conf.d/cobbler.conf
ProxyPass /cobbler_api http://127.0.0.1:25151/
ProxyPassReverse /cobbler_api http://127.0.0.1:25151/
五、Cobbler-Web
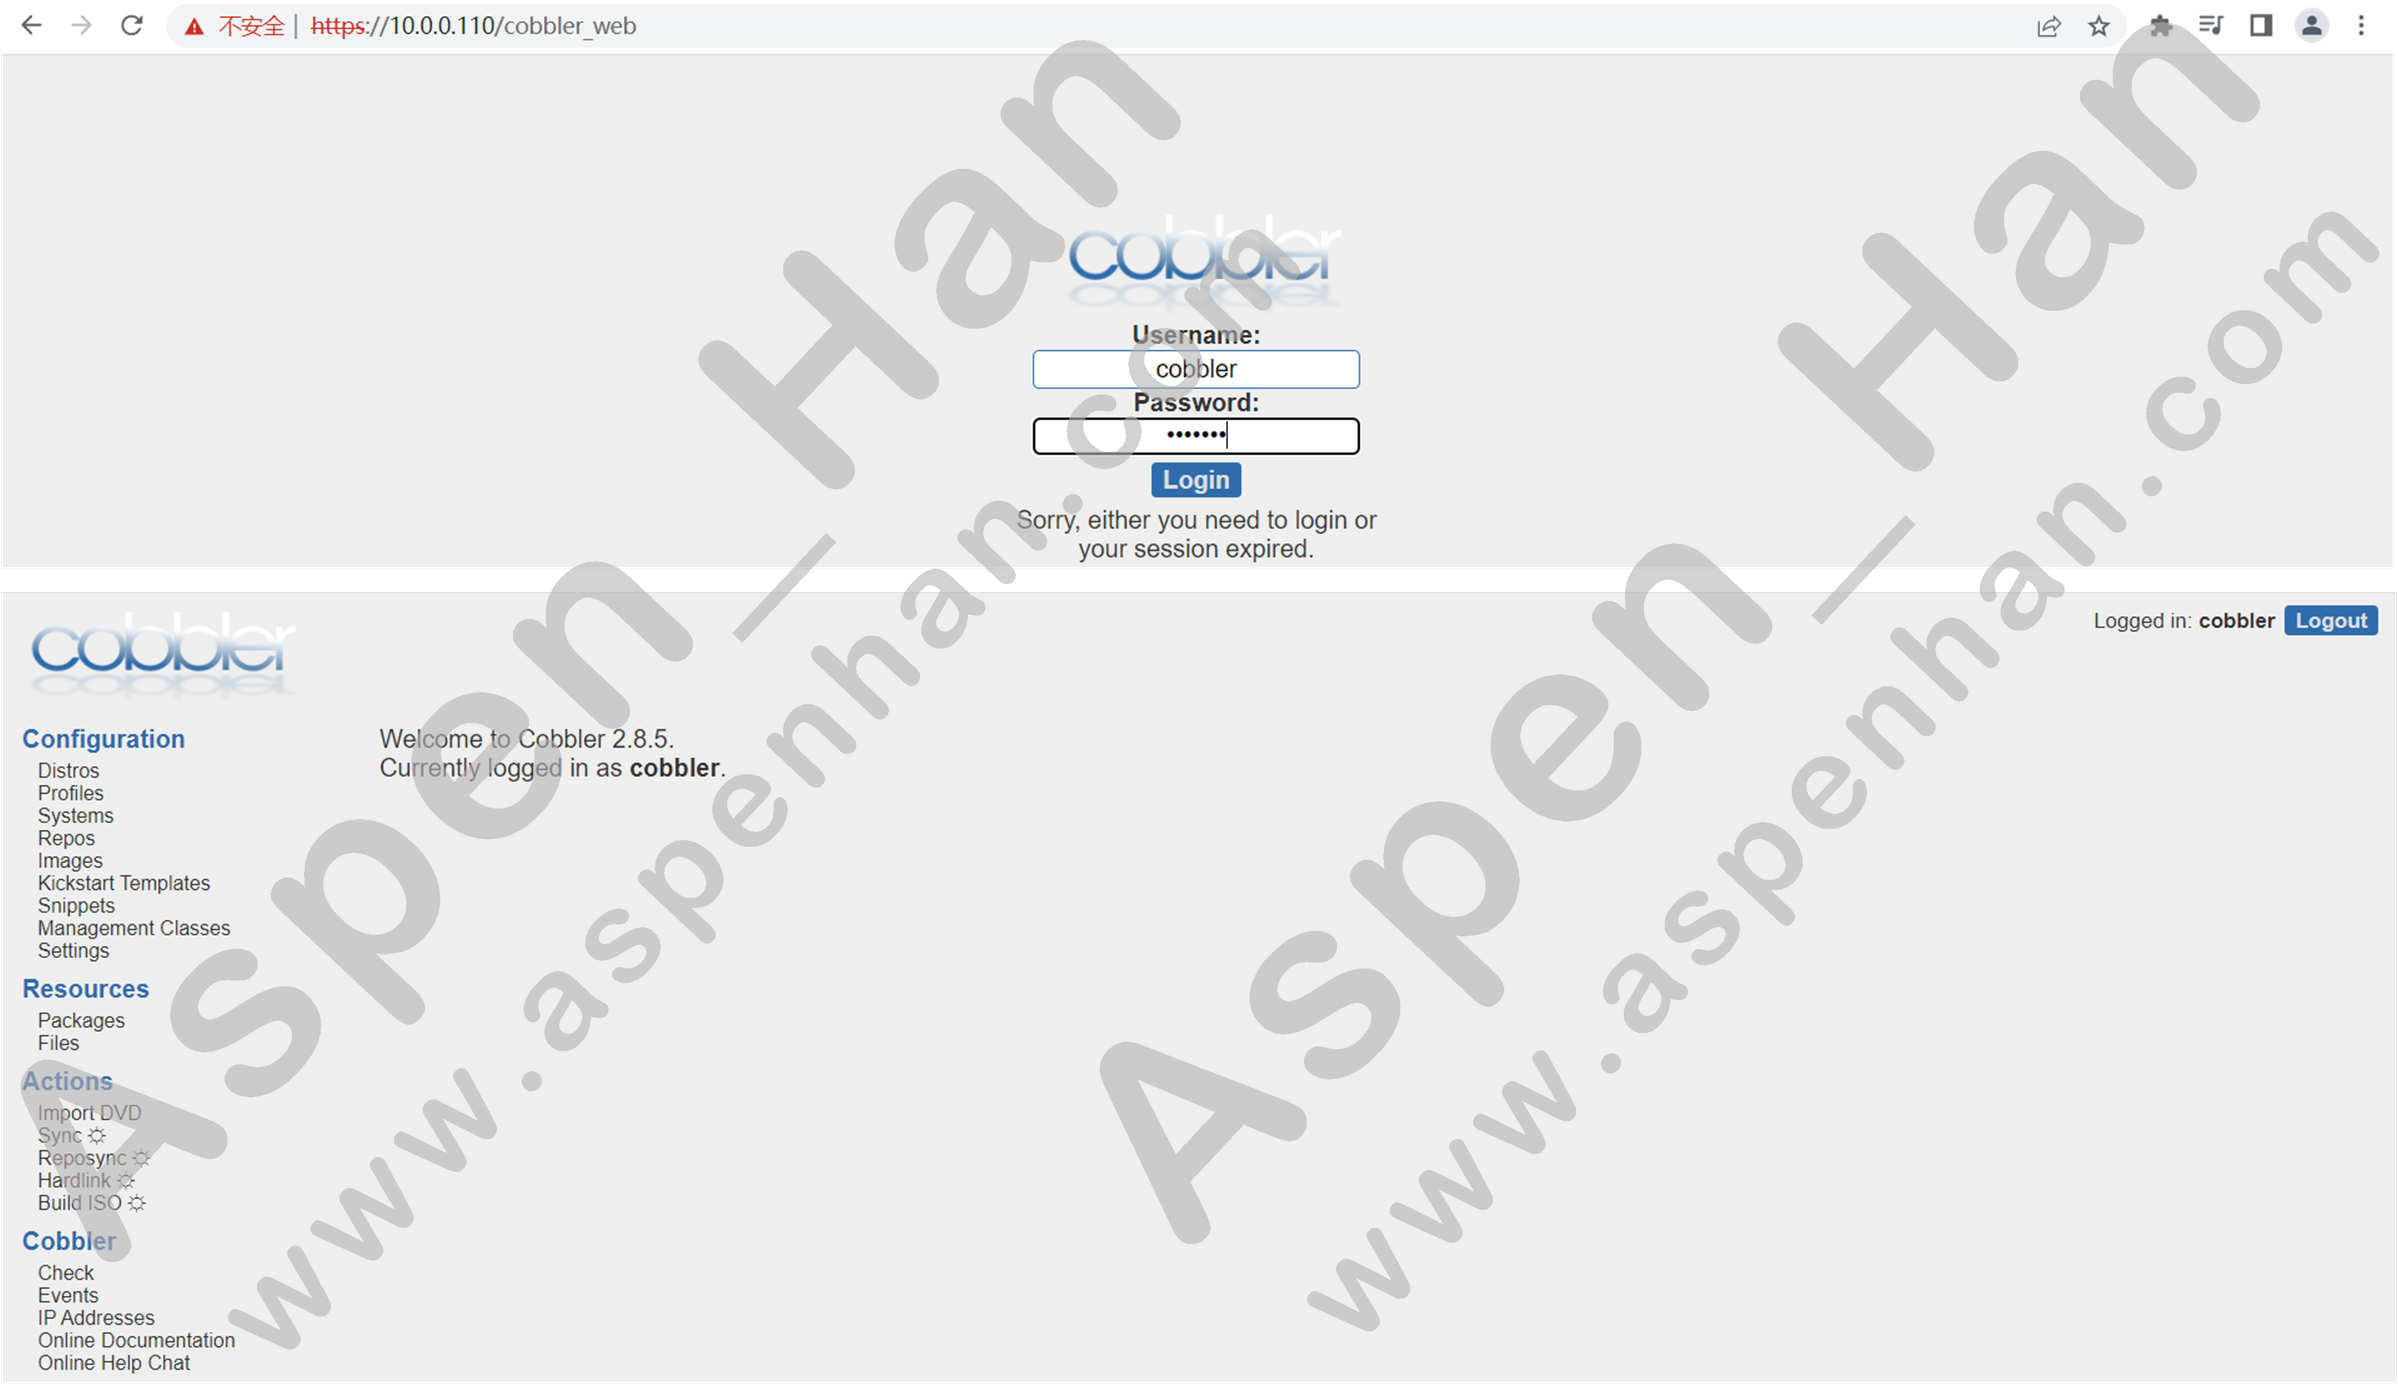
登录界面
| 访问URL https://IP地址/cobbler_web 默认账户名和密码为: cobbler |
修改登录密码
| htdigest /etc/cobbler/user.digest "用户描述" 用户名 #交互式修改密码 |
[root@cobbler ~]# cd /etc/cobbler/
[root@cobbler /etc/cobbler]# tail -3 auth.conf
[xmlrpc_service_users]
admin = DISABLED
[root@cobbler /etc/cobbler]# tail -4 users.conf
[admins]
admin = ""
cobbler = ""
[root@cobbler /etc/cobbler]# cat users.digest
cobbler:Cobbler:a2d6bae81669d707b72c0bd9806e01f3
[root@cobbler /etc/cobbler]# htdigest /etc/cobbler/users.digest "Cobbler" cobbler
Changing password for user cobbler in realm Cobbler
New password:
Re-type new password:
[root@cobbler /etc/cobbler]# cat users.digest
cobbler:Cobbler:f8acd41b9f56390213d766487911ad84
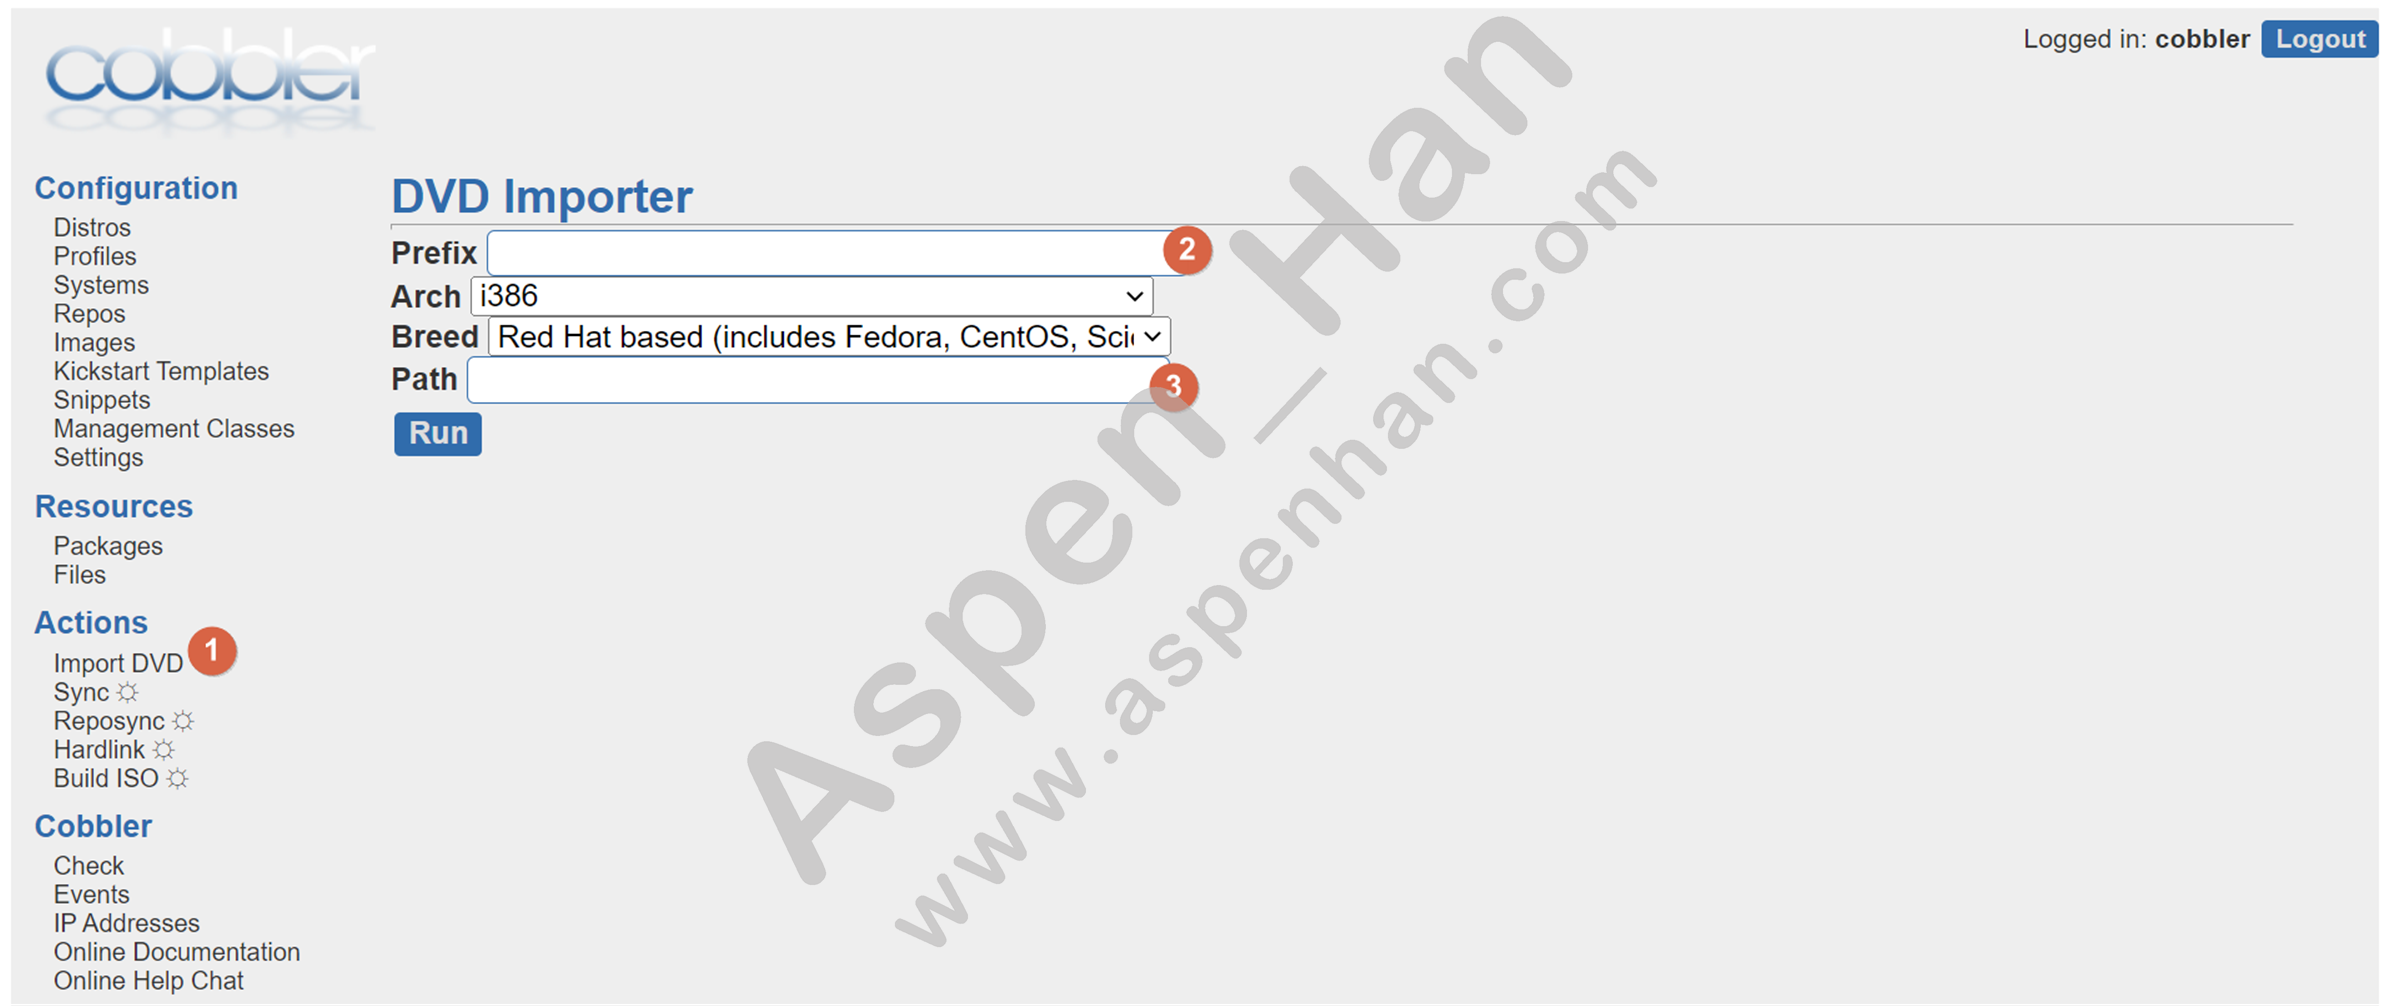
编辑镜像

编辑kickstart文件

导入镜像
六、操作系统安装流程及初始化规范(草本)
1. 操作系统系统安装流程
1.服务器采购
2.服务器验收并设置raid
3.签收验收单
4.服务器上架
5.资产录入
6.将服务器划入装机VLAN
7.根据资产清单上的MAC地址,自定义安装
|
登记信息 1. 机房 2. 机房区域 3. 机柜 4. 服务器位置 5. 服务器网线接入端口 6. 端口MAC地址 7. 操作系统版本与分区规划 8. 自定义安装操作系统所用配置文件 9. 指定服务器的网络信息(IP,MASK,GATEWAY,DNS,HOSTNAME等)和角色 |
8.自动化装机平台,安装系统。
2. 操作系统安装规范
1.当前我公司使用操作系统为CentOS 6和CentOS 7,均使用x86_64位系统,需使用公司cobbler进行自动化安装,禁止自定义设置;
2.版本选择,数据库统一使用cobbler上CentOS-7-DB这个专用的profile,其他Web应用统一使用cobbler上CentOS-7-Web。
3. 系统初始化规范
初始化操作
-
设置DNS
-
安装Zabbix Agent并指定Zabbix Server地址
-
安装批量管理服务环境
-
history记录时间
export HISTTIMEFORMAT="%F %T `whoami` "- 日志记录操作
export PROMPT_COMMAND='{ msg=$(history 1 | { read x y; echo $y; });logger "[euid=$(whoami )]":$(who am i):[`pwd`]"$msg"; }'-
内核参数优化
-
YUM仓库
-
主机名解析
目录规范
- 脚本放置目录: /opt/shell
- 脚本日志目录:/opt/shell/log
- 脚本锁文件目录:/opt/shell/lock
服务安装规范
- 源码安装路径:/usr/local/appname.verion
- 创建软连接:ln -s /usr/local/appname.version /usr/local/appname
主机名命名规范
注意:DNS解析不支持下划线
| 机房名称-项目-角色-集群-节点.域名 |
服务启动用户规范
所有服务统一使用www用户,uid为2000;除负载均衡需要监听80端口使用root启动外,所有服务必须使用www用户启动,使用大于1024的端口。
附 模板机应答文件
# Kickstart Configuration for cobbler by Young Han
# platform=x86, AMD64, or Intel EM64T
# version=DEVEL
# Install OS instead of upgrade
install
# Keyboard layouts
keyboard 'us'
# Root password
rootpw --iscrypted $1$vaSlHHWy$gXZj/WByXvNCGEFoY6JON/
# System language
lang en_US
# System authorization information
auth  --useshadow  --enablemd5
# Use text mode install
text
# SELinux configuration
selinux --disabled
# Do not configure the X Window System
skipx
# Firewall configuration
firewall --disabled
# Network information
$SNIPPET('network_config')
# network  --bootproto=dhcp --device=eth0
# Reboot after installation
reboot
# System timezone
timezone Asia/Shanghai
# Use network installation
url --url="$tree"
# System bootloader configuration
bootloader --location=mbr
# Clear the Master Boot Record
zerombr
# Partition clearing information
clearpart --all --initlabel
# Disk partitioning information
part /boot --fstype="xfs" --size=1024
part /data --fstype="xfs" --size=20480
part swap --fstype="swap" --size=2048
part / --fstype="xfs" --grow --size=1

#Package install information
%pre
$SNIPPET('log_ks_pre')
$SNIPPET('kickstart_start')
$SNIPPET('pre_install_network_config')
# Enable installation monitoring
$SNIPPET('pre_anamon')
%end

%post --interpreter=/bin/bash
$yum_config_stanza
systemctl disable NetworkManager
echo "*/5 * * * * /usr/sbin/ntpdate ntp1.aliyun.com >/dev/null 2>&1" >>/var/spool/cron/root
echo "" >/etc/issue
echo "" >/etc/issue.net
curl -so /etc/yum.repos.d/CentOS-Base.repo https://mirrors.aliyun.com/repo/Centos-7.repo
curl -so /etc/yum.repos.d/epel.repo http://mirrors.aliyun.com/repo/epel-7.repo
echo '* - nofile 65535' >>/etc/security/limits.conf
cat >>/etc/profile<<\EOF
export TMOUT=300
export HISTSIZE=1000
export HISTFILESIZE=1000
export HISTCONTROL=ignorespace
export PS1="[\[\e[34;1m\]\u@\[\e[0m\]\[\e[32;1m\]\H\[\e[0m\] \[\e[31;1m\]\w\[\e[0m\]]\\\$ "
export HISTTIMEFORMAT="%F %T \$(whoami) "
export PROMPT_COMMAND='{ msg=\$(history 1 | { read x y; echo $y; });logger "[euid=\$(whoami )]":\$(who am i):[\$(pwd)]"$msg"; }'
EOF
yum install -y nethogs iftop bash-completion-extras htop &>/dev/null
%end

%packages
@compat-libraries
@debugging
@development
@system-admin-tools
tree
vim
wget
bash-completion
lrzsz
net-tools
sysstat
iotop
unzip
nc
nmap
telnet
psmisc

%end